<?xml version="1.0" encoding="utf-8"?><feed xmlns="http://www.w3.org/2005/Atom" ><generator uri="https://jekyllrb.com/" version="4.4.1">Jekyll</generator><link href="https://noreaq.eu/feed.xml" rel="self" type="application/atom+xml" /><link href="https://noreaq.eu/" rel="alternate" type="text/html" /><updated>2026-05-13T10:45:27+00:00</updated><id>https://noreaq.eu/feed.xml</id><title type="html">Noreaq kayaks</title><subtitle>Skin on frame kayaks</subtitle><entry><title type="html">How to Pack a Skin-on-Frame Greenland Sea Kayak</title><link href="https://noreaq.eu/other/2026/04/10/packing-a-greenland-kayak.html" rel="alternate" type="text/html" title="How to Pack a Skin-on-Frame Greenland Sea Kayak" /><published>2026-04-10T09:25:43+00:00</published><updated>2026-04-10T09:25:43+00:00</updated><id>https://noreaq.eu/other/2026/04/10/packing-a-greenland-kayak</id><content type="html" xml:base="https://noreaq.eu/other/2026/04/10/packing-a-greenland-kayak.html"><![CDATA[<p>Here is my newly added video showing how to pack a Greenland sea kayak.</p>

<p><a href="https://www.youtube.com/watch?v=vCWX5Q7V7gE" target="_blank" class="youtube"><img src="/assets/images/posts/greenland-kayak-packing/greenland-kayak-packing.webp" alt="skin_on_frame_kayak_safety" /></a></p>

<h2 id="packing">Packing</h2>
<p>Besides the small volume of these kayaks, their frame takes up space too. For these reasons, in order to fit all of your gear, you should <strong>organize</strong> your gear well. Although I plan to build a touring skin-on-frame kayak with more gear space, I have longer trips in mind for it, but for a few-day trip I would really like to be able to do it with a Greenland kayak. After all, given how little time you have these days, I think these ‘one-to-few-day’ trips are the most common ones. With a <strong>minimalistic packing</strong> approach, Tetris packing, and a little bit of will, it should be possible. Some positive attitude music is welcome too!</p>

<h3 id="no-hatches">No hatches</h3>
<p>Greenland kayaks did not have hatches. Greenlandic people used their kayaks primarily for one-day trips for <strong>hunting</strong> purposes. Their gear was minimalistic and most of the hunting gear was on deck. Although it’s possible to make them, I’m not a fan of it, mostly because they do not look right to me on a skin-on-frame kayak.</p>

<h3 id="pull-cords">Pull cords</h3>
<p>One ‘popular’ solution among kayakers is to use a <strong>pull cord</strong>, although it can be a potential safety issue because you do not want ropes around your legs. However, I place a sitting pad over the front cord and one part of the cord goes on the outer side of the frame, between the skin and the ribs, so my legs are not in contact with this rope.</p>

<h3 id="front-bag-check">Front bag Check</h3>
<p>Here I have my tent, sleeping bag, and inflatable sleeping pad. The plan is to use my sitting mat during paddling for sleeping too, plus a small inflatable pad with a sleeping bag over it. It should be enough, I think.<br />
As can be seen in the video, I’m checking the front bag / pulling it out to see if it would fit. To fit nicely, I needed to pack my sleeping bag a little differently — I unrolled it a bit and rolled it together with the tent. Additionally, I tightened it with a strap so it takes up less volume.<br />
Inside these end/stem bags, I find it better to have fluffier things like a <strong>tent</strong>, <strong>sleeping bag</strong>, and <strong>clothes</strong>. Harder, bulkier things can get stuck between the ribs, and your hand is not long enough, so… When pulling your bag toward the stem, if it starts to resist, don’t force it. You should remove your bag and repack it to take up less volume.</p>

<h3 id="bungees-between-fore-deck-stringers">Bungees between fore deck stringers</h3>
<p>This was not a part of a traditional Greenland kayak either. It’s something that I added in order to have something like a <strong>‘day hatch’</strong> for my bottle of water / snacks.<br />
You have enough space for your legs during entering and exiting because they are at the sides. Once the kayak is skinned and finished, the bungees are not visible, so it’s a nice feature for me with the preserved Greenland kayak look. As I started to use water bags, I think this place will be useful for my bilge pump. Although I need to test if I can pull it out during sitting in a kayak because of its length and my body at the other side in a small cockpit, I think it can be done because of the bungees so I can turn it aside a little bit. After all, if it can’t be done, it will go on the deck because it does not take up too much space. Additionally, as shown in the video, I placed the tent poles here as it was a problem to fit them inside my 20L front dry bag.</p>

<h3 id="isserfik">Isserfik</h3>
<p>The first deck beam behind the cockpit is the Isserfik — the place where you sit when getting in and out of the kayak. The Isserfik is slightly <strong>thicker</strong> and <strong>stronger</strong> than the rest of the deck beams as it needs to support your weight. It needs to be low enough for a better cockpit coaming angle — for getting in and out, and for easier back rolls. Once you pass this deck beam with your equipment, the rest is a little bit easier.</p>

<p>A 10-litre bag toward the stern should be reserved for clothes, one 5-litre bag for food (with the hope of catching a fish), and one 5-litre bag with essentials like a knife, first aid kit, headlamp, ropes, fire starter…</p>

<h3 id="cone-shaped-bags">Cone shaped bags</h3>
<p>I have managed to store one 5-litre <strong>bag of water</strong> and one 3-litre bag. I would like to increase that, although I don’t need much more than this for a weekend trip. Two litres more and I’d be good. My main water stock is behind the cockpit, as low as possible, which should help maintain <strong>maneuverability</strong> and <strong>stability</strong>. Note the <strong>empty spaces</strong> toward the bow and stern. There are <strong>cone-shaped</strong> kayak bags on the market and now I see that I definitely need one. This should unlock more storage space.</p>

<h3 id="clear-deck">Clear deck</h3>
<p>My goal was to keep the deck <strong>as clear as possible</strong> so I could retain <strong>stability</strong> and <strong>safety</strong> (reentry with a paddle / rolls). It doesn’t look bad for now. The deck will be reserved for my paddle, map and some small things eventually.</p>

<p>D’oh! I forgot to find space for my fishing rod. Do it again!</p>]]></content><author><name></name></author><category term="other" /><summary type="html"><![CDATA[Tips on packing a Greenland sea kayak for a multi-day trip — minimalist approach, gear organisation and load distribution. Find out how.]]></summary><media:thumbnail xmlns:media="http://search.yahoo.com/mrss/" url="https://noreaq.eu/assets/images/posts_list/greenland_kayak_packing.webp" /><media:content medium="image" url="https://noreaq.eu/assets/images/posts_list/greenland_kayak_packing.webp" xmlns:media="http://search.yahoo.com/mrss/" /></entry><entry><title type="html">New Skin-on-Frame Coating Day</title><link href="https://noreaq.eu/tests/2025/11/15/new-skin-on-frame-coating-day.html" rel="alternate" type="text/html" title="New Skin-on-Frame Coating Day" /><published>2025-11-15T10:20:43+00:00</published><updated>2025-11-15T10:20:43+00:00</updated><id>https://noreaq.eu/tests/2025/11/15/new-skin-on-frame-coating-day</id><content type="html" xml:base="https://noreaq.eu/tests/2025/11/15/new-skin-on-frame-coating-day.html"><![CDATA[<p>Besides finding a good skin material, finding a good coating took a considerable amount of time. As mentioned earlier in my ‘<a href="/other/2025/07/12/kayak-care.html">Skin on frame kayak care</a>’ blog, I used alkyd urethane coating for my kayaks - the best I found, ‘marine grade’ - but then again, it’s alkyd-based and resistance to abrasion could be better. It’s a common situation that people use these coatings for their DIY skin-on-frame projects and you get a nice kayak at the end, but resistance to abrasion is usually not so good in comparison to some better solutions. Will it paddle? Yes! Do I need a better coating for myself? Probably not. My <strong>one-year-old alkyd</strong> urethane-coated kayak holds up well and all I’ve got are some <strong>surface scratches</strong> and one bigger one on a sharper rock. But the kayak doesn’t leak anywhere and even if I get a leak, I can easily repair it with a little bit of sealant.</p>

<p class="post-gallery one"><a href="/assets/images/posts/new-coating-day/alkyd_urethane_scratch.webp" data-fslightbox="gallery1"><img src="/assets/images/posts/new-coating-day/alkyd_urethane_scratch_s.webp" alt="alkyd_urethane_scratch" /></a></p>

<h2 id="abrasion-tests-of-alkyd-eurethane">Abrasion tests of alkyd eurethane</h2>

<p>In my 14-day test at sea, one of my kayaks was left on a <strong>slipway</strong> next to the beach two or three times a day for a few hours, and the other one went through a similar test but for a few days less. The kayaks were moved here and there by waves, so I found it to be a great <strong>repeated-abrasion test</strong> (something that skin-on-frame kayaks are not so good at). At the end, as I thought, the kayak keelson and chines got really fine abrasion, but the rest of the skin was like new. Coating at the keelson and chines near the sitting position came off fully in some places, down to the skin. I did not inspect how much abrasion happened on a daily basis. I should have done this because I could have ended my tests sooner maybe, but it doesn’t matter now. Something happened that I expected. On the other hand, I was actually happy because of my <a href="/tests/2024/10/02/the-skin.html">skin</a>. It was like new in these places. In case abrasion had happened on the skin, you would see a little bit of ‘hairy’ parts because every yarn of these fabrics is made of many filaments. These filaments could be seen if you rip off one yarn or if you go over the fabric with sandpaper for a longer time.</p>

<p class="post-gallery one"><a href="/assets/images/posts/new-coating-day/alkyd_urethane_chine_abrasion.webp" data-fslightbox="gallery2"><img src="/assets/images/posts/new-coating-day/alkyd_urethane_chine_abrasion_s.webp" alt="alkyd_urethane_chine_abrasion" /></a></p>

<p>Something I missed is that I did not take photos at first, and the kayak that was on the slipway for a longer period of time has been reskinned and I’m finishing it with a new coating. So on this one I already fixed it by slightly sanding it and doing the recoat on this part with alkyd urethane. Again, this one was on the slipway for a shorter period of time and the situation on both kayaks was similar, but on the first one, abrasion took up a longer part of the chine and keelson. I did not use pigment, so the fix is visible.<br />
Back to coating, I started to look for a <strong>better solution</strong> - a better match for my skin.</p>

<h2 id="skin-on-frame-urethane-coating-properties">Skin-on-frame urethane coating properties</h2>

<p>There are a few main things next to <strong>abrasion resistance</strong> which I tried to cover during my search for a new coating. It needs to be <strong>flexible</strong> (some urethanes are more flexible and some of them less flexible) so it will not crack on impact. That’s the reason why epoxy (in case you were wondering why not epoxy instead of urethane) is a bad solution for skin-on-frame kayaks. Most epoxy products have poor UV resistance, they will yellow in the sun and need UV-filtering urethane coating if you want to protect them. A thin layer of epoxy over flexible skin would crack on the first impact. Further, urethane <strong>coating viscosity</strong> should not be too high because the first coat needs to ‘saturate’ the skin, bite into it, so delamination can’t occur. That’s why it’s good to use a little bit of thinner in the first coat or heat the urethane before application to lower its viscosity. Be aware of heating the urethane because you will reduce the pot life this way. Using smaller batches during coating is a good solution for this problem. ;)<br />
<strong>UV stability</strong> - it will last longer. Loss of flexibility, discoloration or surface cracking is less likely to happen.<br />
<strong>Leveling</strong> - nice leveling is preferred.<br />
<strong>High volume solids</strong> - most are not 100%, but can be very close to it. What you put on your skin mostly stays on it once the coating is cured. ‘VOC free’ product. A very nice property because with 50% volume solid alkyd urethane (50% is pretty high for alkyds), I needed to do 7 coats for my kayak!<br />
It’s no secret that <strong>Coelan</strong> boat coating (aliphatic urethane coating) is one of the best solutions for covering skin-on-frame kayaks. It’s a very toxic product. Based on VOC (this thing evaporates, right?), which is 38.70%, I don’t think volume solids are much higher than in typical alkyd-based urethane. I did not find this information in its specifications so I’m guessing it based on VOC, maybe I’m wrong.<br />
Most of the <strong>two-component</strong> solutions that I tried I was not satisfied with. They had similar abrasion resistance as my new coating but either they were too hard and not flexible enough or they had low volume solids.<br />
Having said that, I would rather use alkyd-based coating with lower abrasion resistance which I can repair easily than having a non-flexible urethane which will crack.<br />
Back to my coating.<br />
So even if <strong>my new coating</strong> is a ‘VOC free’ product (also aliphatic urethane), I found that it has some solvents in it so something will evaporate. I should rather say ‘nearly VOC free’. Anyway, you should always wear a respiratory mask (to get this Breaking Bad <strong>Heisenberg</strong> look!), gloves and eye protection while applying it and during the curing process.<br />
I’m not so into chemistry, but one thing I found was interesting, so I searched a little bit. The thing is that if your coat is <strong>too thick</strong>, <strong>it will cure</strong>, mostly in a 24-hour period. This is not the case with alkyd urethanes. On my first kayak I had a spot behind my cockpit where the coating was too thick. I needed to wait for days until it cured.<br />
So, even if it’s a <strong>one-component</strong> urethane coating, this <strong>aliphatic</strong> urethane is <strong>moisture cured</strong> (moisture-driven isocyanate reaction) in comparison with solvent-based alkyd urethane which <strong>cures by oxidation</strong>. Moisture diffuses very well through urethane while oxygen struggles to reach deep layers. So yes, it can be applied <strong>‘wet on wet’</strong>, actually it should be done this way. I’m doing the first two coats (with pigment) plus one clear coat wet on wet. This third coat will usually cover the skin texture in most places, but there will probably be places where the texture is still visible. Once this cured, but not fully, I’m going with a fourth coat. Although the maximum overcoat time is around 24 hours, I usually wait for a few hours, while the coat is more stable and still tacky (4-6 hours). Additionally, having a one-component urethane, there is no need for mixing anything besides pigment in it. You will want to stir a newly opened can a little bit before use, of course. I’ll probably make a blog about covering the skin, with more details in it.<br />
A <strong>brush or roller</strong> can be used. I’m still experimenting with a <strong>scraper card</strong>, we will see. I did not try spraying (the finish would probably be even nicer) but spraying is more hazardous, you waste your urethane (I like more paint on my kayak than around it, you know) and I don’t think that the first saturation coat will penetrate into the skin well with spraying. With a brush, roller or scraper card, you can <strong>‘squeeze’</strong> it into the skin.<br />
So here it is, high solid, one-component fully aliphatic urethane coating. With great abrasion resistance and flexibility. It’s non-yellowing, does not yellow over time, fully transparent coating and UV stable.</p>

<h3 id="colour-difference">Colour difference</h3>

<p>“I took <strong>burnt umber</strong> earth pigment for my tests. Probably the nicest earth pigment for me. The pigments that I currently use are in my ‘<a href="/creations/west-greenland-kayak">West greenland kayak</a>’ gallery. The image underneath shows the difference in color. New aliphatic urethane coating on the left and old alkyd urethane coating on the right with the same pigment. It’s hard to say what is nicer - pigment mixed with aliphatic coating has a <strong>more true</strong> color, but <strong>‘yellow-saturated’</strong> pigment mixed with alkyd urethane is also very nice for me. The thing is that aliphatic urethane ‘unlocks’ more pigments. I had one more pigment, ‘Umber Dark Ardennen’, which was appealing to me but I could not use it as it always ended up too greenish when it was mixed with alkyd urethane. I can finally try it :) There is also an option for a ‘fully white’ kayak without pigment now.</p>

<p class="post-gallery one"><a href="/assets/images/posts/new-coating-day/urethane_color_comparison.webp" data-fslightbox="gallery3"><img src="/assets/images/posts/new-coating-day/urethane_color_comparison_s.webp" alt="urethane_color_comparison" /></a></p>

<h3 id="thoughness-puncture-and-abrasion-resistance">Thoughness, puncture and abrasion resistance</h3>

<p>I used a Phillips screwdriver for puncture tests. In my <a href="/other/2025/07/12/kayak-care.html">Skin on frame kayak care</a> blog, I wrote that I tried to make a puncture and I did not succeed. Well, my friend came to my workshop, tested my alkyd urethane sample and he did make a puncture with a Phillips screwdriver. I almost started to cry! So it can be punctured, but you need to push really, really hard. At the end, I did it too. The situation is similar with aliphatic coating too but you need to apply <strong>additional</strong> force (I made a hole on the second and third try) in comparison with alkyd urethane coating. And yes, skin-on-frame kayaks do not like very sharp and very narrow objects. The screwdriver test is not the best, because even if I can’t make a hole, it’s a different situation when you hit it in a kayak with all your weight. On the other hand, how many screwdrivers or screwdriver-like objects you find in nature?<br />
I made <strong>four</strong> tests on both coatings with <strong>60-grit</strong> sanding paper (the roughest I could find at home). I tried to use the <strong>same force</strong> on all tests, but the <strong>number of strokes</strong> applied went from more to less, with an <strong>equal number</strong> of strokes for each test on both samples. This is something I was hoping for. <strong>Aliphatic</strong> urethane got mostly <strong>surface scratches</strong> on every test. With the absence of light, tests with fewer strokes are hardly visible at all.</p>

<p class="post-gallery one"><a href="/assets/images/posts/new-coating-day/abrasion_tests_01.webp" data-fslightbox="gallery4"><img src="/assets/images/posts/new-coating-day/abrasion_tests_01_s.webp" alt="puncture_and_abrasion_tests_01" /></a></p>
<p class="post-gallery one">The next two images are made from a different angle, with more light and scratches are more visible. So yes, there are scratches on aliphatic urethane coating too, but much less - more surface scratches than peeled-off coating.<br />
<a href="/assets/images/posts/new-coating-day/abrasion_tests_02.webp" data-fslightbox="gallery4"><img src="/assets/images/posts/new-coating-day/abrasion_tests_02_s.webp" alt="puncture_and_abrasion_tests_02" /></a></p>
<p class="post-gallery one"><a href="/assets/images/posts/new-coating-day/abrasion_tests_03.webp" data-fslightbox="gallery4"><img src="/assets/images/posts/new-coating-day/abrasion_tests_03_s.webp" alt="puncture_and_abrasion_tests_03" /></a></p>

<p>Flathead screwdriver - there are <strong>more fabric yarns</strong> under the wider flathead screwdriver and the result is that I did not succeed in making a hole even with extreme pressure on both samples. With the increasing surface of the object hitting the skin, this is where skin-on-frame kayaks start to shine - <strong>impact resistance</strong>. With the flexibility of skin and coating, they will absorb impacts. In most situations, they will probably outperform all other kayak types.</p>

<p class="post-gallery one"><a href="/assets/images/posts/new-coating-day/abrasion_tests_04.webp" data-fslightbox="gallery4"><img src="/assets/images/posts/new-coating-day/abrasion_tests_04_s.webp" alt="puncture_and_abrasion_tests_04" /></a></p>

<h3 id="flexibility">Flexibility</h3>

<p>This is one more sample I made with new aliphatic urethane coating where I tested the new ‘Umber Dark Ardennen’ pigment. I think this picture tells enough about <strong>elasticity</strong>. Additionally, the puncture test shows it also, because the coating did not crack around the puncture.</p>

<p class="post-gallery one"><a href="/assets/images/posts/new-coating-day/aliphatic_urethane_flexibility.webp" data-fslightbox="gallery5"><img src="/assets/images/posts/new-coating-day/aliphatic_urethane_flexibility_s.webp" alt="aliphatic_urethane_flexibility" /></a></p>

<p>All of my test samples are in my workshop so feel free to come and check them out for yourself ;)<br />
At the end, with good skin and urethane coating, a skin-on-frame kayak can withstand a long period of usage. If you are using it intensively, this period will decrease for sure, but there are a lot of skin-on-frame kayaks which are <strong>15-20 years</strong> old and where the skin still holds up. Not to mention if reskinning is done, you basically have a new kayak.</p>

<p>Although I’ll do on-the-water tests too, the things above are telling me that I finally found the product I can stand behind.</p>]]></content><author><name></name></author><category term="tests" /><summary type="html"><![CDATA[Testing day for new skin-on-frame aliphatic urethane coating]]></summary><media:thumbnail xmlns:media="http://search.yahoo.com/mrss/" url="https://noreaq.eu/assets/images/posts_list/new_coating.webp" /><media:content medium="image" url="https://noreaq.eu/assets/images/posts_list/new_coating.webp" xmlns:media="http://search.yahoo.com/mrss/" /></entry><entry><title type="html">Cockpit Coaming Update</title><link href="https://noreaq.eu/workshop/2025/09/08/cockpit-coaming-update.html" rel="alternate" type="text/html" title="Cockpit Coaming Update" /><published>2025-09-08T07:05:43+00:00</published><updated>2025-09-08T07:05:43+00:00</updated><id>https://noreaq.eu/workshop/2025/09/08/cockpit-coaming-update</id><content type="html" xml:base="https://noreaq.eu/workshop/2025/09/08/cockpit-coaming-update.html"><![CDATA[<p>There are a few things that I recently changed when it comes to cockpit coaming.</p>

<h2 id="coaming-building-form">Coaming building form</h2>

<p>While bending oak, because of wood moisture and steam box conditions, wood fibers become <strong>loose</strong> and the wood becomes softer during bending. My cockpit forms, which are made from wooden pegs (these can be found in my <a href="/workshop/2024/04/27/making-a-greenland-cockpit-coaming.html">Making a Greenland Cockpit Coaming</a> post), used to make <strong>small ‘scars’</strong> in the coaming during bending at <strong>peg locations</strong> where there are greater curvatures. It’s not a big deal, but in order to look nice, more sanding is required, and again, I don’t like sanding, so ‘more sanding’ was not an option! I decided to build <strong>new forms</strong> in order to resolve this problem.<br />
Additionally, I needed a <strong>keyhole cockpit</strong> for my new creations, so I decided to make an ‘extension’ form to which I can attach my existing Greenland cockpit form with two wooden pegs so I can make a keyhole coaming.</p>

<p class="post-gallery two"><a href="/assets/images/posts/greenland-coaming-update/greenland_coaming_form.webp" data-fslightbox="gallery1"><img src="/assets/images/posts/greenland-coaming-update/greenland_coaming_form_s.webp" alt="greenland_coaming_form" /></a><a href="/assets/images/posts/greenland-coaming-update/coamings.webp" data-fslightbox="gallery1"><img src="/assets/images/posts/greenland-coaming-update/coamings_s.webp" alt="coamings" /></a></p>

<h3 id="a4-stainless-steel-screws-instead-of-bronze-screws">A4 stainless steel screws instead of ‘bronze’ screws</h3>

<p>After <strong>three weeks of testing</strong> at sea, I left one of my kayaks in the sea for the <strong>whole time</strong>, tied to shore, just to see what would happen. The A4 stainless steel screws at the stem protections looked like new ones, but I did not like what I saw on my cockpit coaming ‘bronze’ screws. I like patina, but I noticed some small spots of rust too, so is it true bronze? Probably some thin layer of bronze - bronze plated… whatever. I decided to <strong>switch to A4 stainless steel screws</strong>. Darker colors look nicer to me with oak wood, but this is not bad either, and more importantly, I know it will last.</p>

<p class="post-gallery one"><a href="/assets/images/posts/greenland-coaming-update/coaming_inox_a4_screws.webp" data-fslightbox="gallery2"><img src="/assets/images/posts/greenland-coaming-update/coaming_inox_a4_screws_s.webp" alt="greenland_coaming_inox_a4_screws" /></a></p>

<h3 id="cockpit-coaming-rope-lip">Cockpit coaming rope lip</h3>

<p>Additionally, I’ve decided to try a somewhat different cockpit edge/lip: a <strong>rope lip</strong>. I’m not reinventing the wheel here either.</p>

<p>Again, most traditional cockpit coamings didn’t have a lip. Mostly some small pieces of <strong>bent wood</strong> attached to the <strong>back edge</strong> of the coaming. Let’s say that a lip around the whole coaming is a bit of a modern touch to traditional coaming.<br />
Looking at ‘Kayaks of Greenland’ by Harvey Golden, I found that Maligiaq Padilla stitched 5mm rope to the coaming for his rolling kayak that he built.<br />
‘Maligiaq Padilla of Sisimiut built this rolling kayak in November/December of 1998. At the time it was built, Maligiaq Padilla had at age 16 become the youngest Greenlander to win top ratings at the Greenland National Kayaking Championships.’<br />
‘Padilla stitched a 3/16” (5mm) diameter line to the coaming…’<br />
I found 10mm and 16mm <strong>three-strand black HT Polyester rope</strong>, commonly used in nautical applications. I cut one end, but with a few turns of insulation tape before cutting in order to stop unraveling, and lightly melted it with a lighter. I set the rope around the coaming with a few clamps so I could tighten it and mark the other end for cutting, then removed the rope from the coaming. After doing the same at the other end, I melted both parts with a heat gun and firmly connected both parts. Nothing smells better than polyester! You’ll eventually need a clamp for mounting the rope on a coaming because it’s a tight fit.</p>

<p class="post-gallery two"><a href="/assets/images/posts/greenland-coaming-update/rope.webp" data-fslightbox="gallery3"><img src="/assets/images/posts/greenland-coaming-update/rope_s.webp" alt="three_strand_rop" /></a><a href="/assets/images/posts/greenland-coaming-update/rope_ends.webp" data-fslightbox="gallery3"><img src="/assets/images/posts/greenland-coaming-update/rope_ends_s.webp" alt="cutting_rope_ends" /></a></p>

<p>After attaching/sewing the coaming to the skin, I’ll need <strong>one more pass</strong> of lashing in order to firmly attach the rope lip to the coaming. I think it will be robust enough for its purpose, but time will tell. Something that I know is I like ropes and threads more than screws!</p>

<p class="post-gallery two"><a href="/assets/images/posts/greenland-coaming-update/rope_end_melt.webp" data-fslightbox="gallery4"><img src="/assets/images/posts/greenland-coaming-update/rope_end_melt_s.webp" alt="rope_end_melt" /></a><a href="/assets/images/posts/greenland-coaming-update/coaming_rope_lip.webp" data-fslightbox="gallery4"><img src="/assets/images/posts/greenland-coaming-update/coaming_rope_lip_s.webp" alt="rope_lip" /></a></p>

<p>I must say it looks nice to me, so I know what I’ll use in my next kayak build for a coaming lip. ;)<br />
More coaming details can be found in <a href="/creations/greenland-cockpit-coaming">creations</a> section.</p>]]></content><author><name></name></author><category term="workshop" /><summary type="html"><![CDATA[Making a Greenland cockpit coaming from steam-bent Slavonian oak with rope as a lip]]></summary><media:thumbnail xmlns:media="http://search.yahoo.com/mrss/" url="https://noreaq.eu/assets/images/posts_list/greenland_coaming_update.webp" /><media:content medium="image" url="https://noreaq.eu/assets/images/posts_list/greenland_coaming_update.webp" xmlns:media="http://search.yahoo.com/mrss/" /></entry><entry><title type="html">Kayak Safety and self-rescue</title><link href="https://noreaq.eu/on-the-water/2025/08/05/kayak-safety.html" rel="alternate" type="text/html" title="Kayak Safety and self-rescue" /><published>2025-08-05T07:20:43+00:00</published><updated>2025-08-05T07:20:43+00:00</updated><id>https://noreaq.eu/on-the-water/2025/08/05/kayak-safety</id><content type="html" xml:base="https://noreaq.eu/on-the-water/2025/08/05/kayak-safety.html"><![CDATA[<p>I usually like to come back alive from kayaking. It goes without saying that safety is paramount here.</p>

<h2 id="in-general">In general</h2>

<p>Knowing how to do a <strong>wet exit</strong>, <strong>bracing</strong>, <strong>self rescue</strong>, and <strong>roll</strong> your kayak are some of the most important things regarding safety.<br />
Someone will say that having a wetsuit and knowing how to do a wet exit will be enough, but will you dare to go paddling a little farther from the shore?<br />
With these techniques, you will have more self-confidence when you are paddling alone, going longer distances, or dealing with waves.</p>

<p>One thing that goes before them all is to use your brain, be able to recognize dangerous situations, and <strong>stay out of trouble</strong>, because it’s much easier than dealing with trouble.</p>

<p>Although <strong>wet exits</strong> from these ocean-type smaller Greenlandic cockpits are much easier than entering them, you should learn this with a friend next to you, so you can get assistance if something goes wrong. Once you know how to do it, you will feel safer and with more self-confidence. Another step is rolling. :)<br />
<strong>Learning to roll</strong> is much easier with having a good instructor next to you, or at least someone who will assist you if you fail with your roll. If you know wet exit, you can practice rolls alone, but it’s the worst-case scenario because it can get a little frustrating doing wet exits, dumping water, and reentering your kayak on every failed roll (my scenario).<br />
<strong>Do not</strong> practice this on rivers (moving water) or in water that’s too shallow for safety reasons.</p>

<p>Whether you are on the <strong>river</strong> or <strong>the sea</strong>, there are always <strong>dangers you need to be aware of</strong>.<br />
What comes first to my mind while paddling <strong>rivers</strong> is to stay away from <strong>log jams</strong>. They usually can be found on outer parts of river bends, and the river where I’m paddling the most (river Drava) has plenty of them. Rivers are mostly deeper and faster on outside bends, and with erosion, logs can accumulate in these parts. If you are not experienced, you could end up in logs, and if you get stuck here by accident, the current is strong and you could end up underneath the logs. Bye. Stay away from these river parts and better paddle inside river bends where the current is slower.<br />
Although I do not have any experience with <strong>river dams</strong>, low-head dams create powerful recirculating currents that can trap and drown even experienced kayakers. Avoid them.</p>

<p><strong>Shallow water drowning</strong>. You may think you are safe in shallow water if you are outside of your kayak, but if this water is fast, it’s better not to stand on the river bottom. If your leg gets stuck somewhere by accident, strong river flow will submerge you. In these situations, it’s better to swim completely to the shore without touching the river bottom.</p>

<p>You should be even more cautious when paddling at <strong>the sea</strong>.<br />
<a href="https://www.marinetraffic.com/en/ais/home/centerx:2.7/centery:51.2/zoom:6&amp;ved=2ahUKEwii7KTi4PCOAxXQ-gIHHXhQH8UQFnoECA4QAQ&amp;usg=AOvVaw2i6ChbO7fNN2SWpmRP4Hcr" target="_blank">Marinetraffic</a> is something you’ll want to check while planning your route. <br />
Check the weather forecast and winds. What wave size can you handle? There are waves generated in distant weather systems, and they will be present even if there is no local wind.<br />
On larger waves, keep your distance from shore. Waves could crush you and your kayak onto rocks.</p>

<p><strong>Wear a PFD</strong>. In 99% of situations you will not need one, but you should wear it always because of that one percent of situations.</p>

<p><strong>Dress for immersion</strong>, according to water temperature and hypothermia prevention. Google it.</p>

<p>Skin-on-frame kayaks do not have air chambers, so it’s good to have <strong>float bags</strong> that will add additional buoyancy and reduce the amount of water that can enter the kayak.<br />
<strong>Gear dry bags</strong> will also help. There are float bags made specifically for kayak stems. I use pull cord (cord tied in a loop from the cockpit to the stems, with one part underneath the ribs and one part over the ribs, installed during the frame build) in all of my kayaks for easier packing (a popular solution among skin-on-frame kayakers), so you can pull the float/dry bag to the stems.</p>

<p class="post-gallery one"><a href="/assets/images/posts/kayak-safety/pull_cord.jpg" data-fslightbox="gallery1"><img src="/assets/images/posts/kayak-safety/pull_cord_s.jpg" alt="pull_cord" /></a></p>

<p>I’ll make a separate detailed post about packing a Greenland kayak and pull cords, but I wanted to mention this here because the front pull cord <strong>may potentially create a safety problem</strong> since I do not like any type of cords around my legs when I want to exit my kayak! I have tried numerous times to exit from the kayak on land and in very shallow water and have not had any problems. If you are unsure about this for any reason, please remove the front cord. I can always install the front float bag after the frame build, before skinning.</p>

<h3 id="self-rescue-in-a-skin-on-frame-kayak">Self rescue in a skin on frame kayak</h3>

<p><a href="https://www.youtube.com/watch?v=RgdYQnMf4vI" target="_blank" class="youtube"><img src="/assets/images/posts/kayak-safety/kayak-safety.webp" alt="skin_on_frame_kayak_safety" /></a></p>

<p>Here is my video where I’m showing self rescue in my totally submerged West Greenland skin-on-frame kayak. This one is my recent build, LOA 520cm, beam 53cm, and it weighs 12kg. :)<br />
I forgot to take my bilge pump with me, but with this method, there is so <strong>little water</strong> left in a kayak that it does not affect its stability, so you can continue paddling to shore safely to remove the rest of the water with a sponge or use a bilge pump.</p>

<p>A kayak full of water will be a rare case, but it can be seen how fast it can be done. It’s a little harder if you are not standing on the ground, but as you can see, it can be done with a little leg work. :) It’s easier to do this with additional buoyancy, so here is <strong>one more reason to wear a PFD</strong>.</p>

<p>This type of self rescue is for an <strong>unloaded kayak</strong>, although with these low-volume kayaks that I use mostly for one-day paddling, it’s also manageable to do it if you are not carrying too many things (I mostly do it with one 5-liter dry bag with personal things and snacks, and a bottle or two of drinking water).</p>

<p>It is good to practice in the conditions you will paddle in. I’m just saying this because you could confront wind or waves. For the same reason, it is good to know this rescue without a diving mask or nose clips. In case you have hard times with sea water and your nose (although it’s good for your nasal passages), exhaling gently through the nose while upside down/blowing bubbles can help prevent water from entering the nose.</p>

<p>This type of rescue is actually easy because of the Greenland paddle. If you know wet exit and how to enter your kayak using a Greenland paddle as an outrigger, you are more than halfway to this rescue. This ‘cowboy’ straddling is easy once you know how to use your paddle as an outrigger.</p>

<p>In the end, there is always risk involved with an adventure, but knowing more about safety and different techniques that can save you will reduce that risk.<br />
You probably heard the famous <strong>quote</strong>: ‘A ship is safest in a harbor, but that’s not what ships are built for’ - John A. Shedd.</p>]]></content><author><name></name></author><category term="on-the-water" /><summary type="html"><![CDATA[I usually like to come back alive from kayaking. It goes without saying that safety is paramount here. Kayak safety tips and self-rescue for West Greenland skin-on-frame kayaks]]></summary><media:thumbnail xmlns:media="http://search.yahoo.com/mrss/" url="https://noreaq.eu/assets/images/posts_list/safety.webp" /><media:content medium="image" url="https://noreaq.eu/assets/images/posts_list/safety.webp" xmlns:media="http://search.yahoo.com/mrss/" /></entry><entry><title type="html">Skin on frame kayak care</title><link href="https://noreaq.eu/other/2025/07/12/kayak-care.html" rel="alternate" type="text/html" title="Skin on frame kayak care" /><published>2025-07-12T09:20:43+00:00</published><updated>2025-07-12T09:20:43+00:00</updated><id>https://noreaq.eu/other/2025/07/12/kayak-care</id><content type="html" xml:base="https://noreaq.eu/other/2025/07/12/kayak-care.html"><![CDATA[<p>It’s worth mentioning that every type of urethane, even UV-resistant ones, will degrade in the sun with prolonged exposure. The same goes for <strong>composite</strong> or <strong>plastic</strong> kayaks, plus they can deform too. Keep your kayak <strong>out of the sun</strong> in a <strong>dry place</strong> when you are not paddling it, and this will prolong its life. <strong>A garage</strong> would be a nice place. <strong>A backyard</strong> would be fine too, but putting some type of roof over it would be good. It’s good to leave the cockpit <strong>open</strong> so air can circulate through it.</p>

<p>Skin-on-frame kayaks are <strong>not susceptible to rotting</strong>, although these kayaks have their frame covered with <strong>decking oil</strong> just in case. They do not spend all their life in water like boats. The frame is made in such a way that only a small part of it is in touch with the skin, so water is not retained in between. However, there are a few things required for rot: prolonged exposure to moisture, oxygen, and specific temperature.</p>

<p>I made this stand for my kayaks so once the kayak is in this position (picture), all the water (if present) will accumulate near the cockpit. It’s very easy to remove it with a sponge this way.</p>

<p><img src="/assets/images/posts/skin-on-frame-kayak-care/stand.jpg" alt="skin_on_frame_kayak_stand" /></p>

<p><strong>Remove the water</strong> from your kayak (it will be dry very fast this way), keep it in <strong>dry place</strong> and <strong>out of the sun</strong> after kayaking. It will last for a long time this way.</p>

<h2 id="protection">Protection</h2>

<p>Most <strong>abrasion</strong> happens where the skin touches the frame. That would be the keelson and chines. I usually make oak strips (soaked in tung oil) and attach them with A4 stainless steel screws to keelson ends/stems.<br />
Although there are also some historical kayak examples that had protections on chines too, I do not put them on my kayaks.</p>

<h2 id="skin-on-frame-thoughness-and-durability">Skin on frame thoughness and durability</h2>

<p>Can this translucent skin be durable? <br />
<img src="/assets/images/posts/skin-on-frame-kayak-care/tough.jpg" alt="skin_on_frame_toughness" /></p>

<p>Well, yes. I’ve made a separate blog <a href="/tests/2024/10/02/the-skin.html">The Skin - ‘Amiq’</a> where the <strong>skin material</strong> is described a little better.<br />
In combination with good <strong>urethane coating</strong> (with good flexibility and abrasion resistance), these boats become quite tough.</p>

<p>It’s hard to compare with other types of kayaks, but with flexible skin, these kayaks ‘absorb’ impacts. They have <strong>great impact resistance</strong>, probably the best of all kayak types.</p>

<p>On the other hand, although they are more than resistant enough to abrasion, a plastic kayak would be a winner here. You can haul it through sand and rocks without worry, and at most you will get surface scratches from rocks, but with a kayak weight of 12-13kg, you can easily carry it with one hand.<br />
On the other hand, <strong>very sharp rocks</strong> or <strong>oysters</strong> could make a puncture. That’s why skin-on-frame kayaks are nice for sea, river, or lake, but they are not for whitewater.</p>

<h3 id="tests">Tests</h3>

<p>I tried to make a <strong>puncture with a screwdriver</strong> (very hard push and hit) and I did not succeed. I would not go into details with my tests because it’s simply not a real-life situation. There is a big difference when you hit a sharp object in moving water with all of your weight.<br />
The urethane coating that I use at the moment is nice, UV-resistant, and has good flexibility, but it’s a one-component <strong>alkyd urethane</strong>, and repeated abrasion is something that could be better after my tests. That is something I’m constantly working on, and I’ll switch to <strong>something a little</strong> different soon.</p>

<p>Greenlanders reskinned their kayaks every year or two. The seal skin was rotting, so it was needed. With modern materials of today, the situation is much different. In the end, once the skin is all beaten up, with reskinning of the kayak, you get a new kayak. That is something you can <strong>do yourself</strong>, and I’ll make a separate post about it.</p>

<p><em><strong>Update</strong></em><br />
I finally found a great aliphatic urethane coating, so you may want to check out my ‘<a href="/tests/2025/11/15/new-skin-on-frame-coating-day.html">New skin on frame coating day</a>’ blog.</p>

<h2 id="repairs">Repairs</h2>

<p>For quick/on-the-water repairs, I always bring a few meters of <strong>duct tape</strong> with me, although I have not needed it so far.<br />
<strong>Punctures</strong> can be sealed with urethane or SMP (MS Polymer) based sealants. I experimented a little, and Bison Poly Max high tack express is a good one.<br />
It will stick well to urethane, but keep in mind that urethane alkyd (and probably most urethanes) varnish will not cure well if you cover it over SMP-based sealant.</p>

<p>I’m mentioning this because maybe you would like to do it with urethane varnish. If you go this route, it’s better to slightly sand the place with the puncture and apply a few urethane coatings directly over it without sealant. Urethane alkyd varnish is usually thick enough to cover small punctures.<br />
I’m constantly <strong>searching for better coating options</strong> on the market, so I’ll give more details about it once I settle on one, because not all urethanes will stick well to already cured urethane coating.</p>

<p>The worst-case scenario would be a <strong>tear in the skin</strong>. It happens very rarely, and I haven’t heard of it happening to anyone. In this case, it would be necessary to stitch this place with a curved upholstery needle and fishing braided line (eventually fabric patch) before applying urethane/sealant over it.</p>]]></content><author><name></name></author><category term="other" /><summary type="html"><![CDATA[Essential maintenance tips for skin on frame kayaks. With proper storage and maintenance you can extend your SOF kayak's lifespan and keep it seaworthy for years of paddling adventures.]]></summary><media:thumbnail xmlns:media="http://search.yahoo.com/mrss/" url="https://noreaq.eu/assets/images/posts_list/care.webp" /><media:content medium="image" url="https://noreaq.eu/assets/images/posts_list/care.webp" xmlns:media="http://search.yahoo.com/mrss/" /></entry><entry><title type="html">Greenland kayak purpose</title><link href="https://noreaq.eu/other/2025/06/10/greenland-kayak-purpose.html" rel="alternate" type="text/html" title="Greenland kayak purpose" /><published>2025-06-10T07:20:43+00:00</published><updated>2025-06-10T07:20:43+00:00</updated><id>https://noreaq.eu/other/2025/06/10/greenland-kayak-purpose</id><content type="html" xml:base="https://noreaq.eu/other/2025/06/10/greenland-kayak-purpose.html"><![CDATA[<p>Qajaq. Greenland kayaks are believed to be around 4,000 years old. The main purpose of traditional Greenlandic kayaks was hunting. It was often called an extension of the hunter’s body, which enabled him to silently approach his prey with a harpoon. Possible <strong>the oldest</strong> museum example, that I found in ‘Kayaks of Greenland’ book by Harvey Golden, dates back to circa pre 1607. (Schiffergesellschaft, Lubeck)</p>

<h2 id="once-upon-a-time-in-greenland">Once upon a time in Greenland</h2>

<p>These people were excellent paddlers and knew many ways to roll a kayak, or return to the surface in the event of capsizing, regardless of the position they were in at the time of capsizing.<br />
<strong>The ‘Tuilik’</strong> or suit they used was made of animal skin and was waterproof around the hands and head, and was attached to the coaming. During warmer months they used <strong>‘Akuilisaq’</strong> (very similar to a modern spray skirt). Getting out of the kayak in the event of capsizing was not an option, because without a dry suits, even in summer sea temperatures of only a few degrees, it meant hypothermia and death.<br />
They lived exclusively from <strong>hunting</strong>, so having a kayak was a status symbol in society; anyone who didn’t know how to make one didn’t hunt, didn’t have a family… in short, the <strong>kayak meant life</strong> to them. Because of this and because of the development of these boats through thousands of years, these are probably the main reasons why they brought these vessels to perfection — to hunt and survive in rough sea conditions.</p>

<p>These kayaks were developed depending on which part of Greenland we are talking about, so there are kayaks from <strong>West, South, East and Polar Greenland</strong>. Different sea conditions and probably different ways of hunting led to the development of different types of these kayaks. They were mostly small in volume, shallow, long, and narrow, so the ‘freeboard’ or the part above the waterline was quite low. This was important for them because they were much less affected by the wind (one of the reasons why the increase in volume also led to the use of a rudder in more modern touring kayaks), they needed less visibility for hunting, and rolling was much easier.</p>

<p>It goes without saying that they were top craftsmen because they made kayaks with a few tools, driftwood and seal skin.</p>

<h3 id="greenlandic-kayaks-today">Greenlandic kayaks today</h3>

<p>Nowadays, hunting is done with more modern vessels, and the kayak has remained a symbol of Greenlandic identity, along with traditional games of rolling, throwing harpoons from kayaks…<br />
Besides this, because of their smaller volume, they are very nice crafts for <strong>one-day trips</strong>, although with today’s modern equipment that is getting smaller and smaller, it’s possible to do <strong>even multi-day trips</strong>.<br />
It will paddle great on the sea, river, or lake, but they are not for whitewater.</p>]]></content><author><name></name></author><category term="other" /><summary type="html"><![CDATA[A little bit of history and main purpose of the skin-on-frame Greenland hunting kayak.]]></summary><media:thumbnail xmlns:media="http://search.yahoo.com/mrss/" url="https://noreaq.eu/assets/images/posts_list/purpose.webp" /><media:content medium="image" url="https://noreaq.eu/assets/images/posts_list/purpose.webp" xmlns:media="http://search.yahoo.com/mrss/" /></entry><entry><title type="html">The skin - ‘Amiq’</title><link href="https://noreaq.eu/tests/2024/10/02/the-skin.html" rel="alternate" type="text/html" title="The skin - ‘Amiq’" /><published>2024-10-02T17:20:43+00:00</published><updated>2024-10-02T17:20:43+00:00</updated><id>https://noreaq.eu/tests/2024/10/02/the-skin</id><content type="html" xml:base="https://noreaq.eu/tests/2024/10/02/the-skin.html"><![CDATA[<p>Back in the old days, the covering of Greenland kayaks was mostly done with seal skin. H.C. Petersen writes in his ‘Instruction in Kayak Building’: “…when the seal population of Greenland began to decline at the beginning of the present century, it became difficult for many hunters to get hold of the required number of suitable kayak-skins. More and more hunters have therefore started to cover their kayaks with canvas or duck.”</p>

<h2 id="modern-fabrics">Modern Fabrics</h2>

<p>With the invention of modern materials, polyester and nylon (polyamide) became the two most used materials because of their lightness, strength, abrasion resistance, and rot resistance. Both materials have their pros and cons.</p>

<h3 id="polyester">Polyester</h3>
<p>Polyester is a little better in UV resistance, but it’s less abrasion-resistant than nylon, and most coatings will stick to it without a problem. It can be tricky to work with because it will not stretch like nylon, so it’s harder to apply it nicely to follow kayak curves, and you could get wrinkles—but this is resolved by shrinking it with an iron. That said, if you look for polyester fabric, you should find one that is not preshrunk!</p>

<h3 id="polyamide">Polyamide</h3>
<p>To be precise, ballistic nylon. It was developed by the DuPont corporation as a material for bulletproof vests in WWII, with great abrasion and puncture resistance. It’s nice to work with as it follows kayak curves because of its stretchiness. Next to greater abrasion resistance, this stretchiness is actually the second important reason why <strong>I chose nylon</strong>. It will simply <strong>better absorb hits</strong> if struck with something. On the downside, it’s hygroscopic, so it can relax a little in humid and cold weather, so you get loose skin in these conditions. This effect mainly disappears over time, but to prevent this, it’s important to tighten it correctly around the frame, even sewing the fabric when wet if needed. Not every coating will stick to it, but oil-based urethanes will do the trick, and most of these will have good UV resistance too. So, if applied correctly, these downsides can be avoided.</p>

<p>The USA has more skin-on-frame kayak builders, so more choice of materials too.<br />
Skin material was actually my main problem because I wanted to find ‘my skin,’ and Europe was the perfect place where you don’t have to look for it!</p>

<h2 id="tests">Tests</h2>

<p>After too many emails with various fabric companies and too many fabric samples, I finally found it. I wanted to provide all my tests of different fabric types in this blog at first, but I changed my mind because it would take an eternity, and most materials were not so good, so I’ll try to explain the results briefly.</p>

<p>I tested <strong>polyamide woven fabrics</strong>. So what’s exactly ballistic nylon? Polyamide fabric woven with basket/panama type of weave and yarn that is smooth. Ballistic nylon from one German store is strong but has a very loose weave, so once you start tightening it around the frame, you will get large pull holes that can be sealed, but with more applied strength, these holes open even more, and this is something that concerns me. I’ve tested one more similar German fabric with nearly identical results. Further, Cordura classic (developed and trademarked by DuPont) polyamide 6.6 fabric woven with plain weave is a superb material that is very similar to ballistic in strength and abrasion resistance, but the biggest problem is that it’s made with ATY (air textured yarn), so the surface is a little fluffy or hairy, and this creates problems during urethane coating, so you can’t get a smooth surface.</p>

<p><strong>Finally</strong>, the fabric that I’ve found to be the best for my needs is <strong>nylon 66</strong> fabric with durable rib weave. Depending on the batch, it has a width of approximately 165 cm and weighs approximately 270 g/m², and is woven with yarn of 470dtex. Dtex? In short, the weight of fabric yarn. So if compared to, let’s say, 1100dtex fabric, does it have much less strength? Yes, if both materials have the same number of threads/cm, but this is a tightly woven fabric with the most threads/cm of all fabrics that I’ve tested. Having said that, its <strong>tensile strength</strong> for warp/weft goes over <strong>4000N/3000N</strong> (ISO 13934-1), which is actually stronger than Cordura classic 1100dtex in 260 g/m² (warp/weft over 3200N/2300N ISO 13934-1) and similar strength to one German ballistic nylon that I’ve tested in 940dtex / 290 g/m² (warp/weft over a little bit over 4000N / ISO 13934-1). Why nylon 66? Nylon 6 and 66 are the two most commonly used synthetic polymers known as polyamides. <strong>Nylon 66</strong> is 33% more resistant to abrasion than nylon 6, it has a higher melting point, higher heat deflection temperature, lower water absorption rate, and better chemical resistance to acids.</p>

<p>Because of the <strong>tighter weave</strong>, this fabric can be pulled hard during tightening of the fabric with thread and while sewing. <strong>Pull holes?</strong> Yes, it’s something that’s normal because the fabric is not fixated with coating yet. You will get acceptable pull holes, and most importantly, the holes will not be bigger if extreme force is applied. I always use sealer for these holes anyway. It’s hard to describe the details here with words, but I’ll explain this more in my ‘sewing the skin’ blog with detailed images provided.</p>

<p>Speaking about <strong>colors</strong>, I do not know how it will accept acid dyes because I’m not using ones. Due to more threads per cm of this fabric, I didn’t want to take any risks with the acid dyes. Because of applying it diluted in water, before urethane covering, there is possibility of urethane not protruding well into fabric and cause delamination of it. That’s why I cover the skin with <strong>earth pigments only</strong>.</p>

<p><em><strong>Update</strong></em><br />
I finally found a great aliphatic urethane coating, so you may want to check out my ‘<a href="/tests/2025/11/15/new-skin-on-frame-coating-day.html">New skin on frame coating day</a>’ blog.</p>]]></content><author><name></name></author><category term="tests" /><summary type="html"><![CDATA[From traditional sealskin and canvas to more modern materials such as polyester and polyamide. In search of the ideal skin-on-frame kayak fabric with optimal durability and abrasion resistance.]]></summary><media:thumbnail xmlns:media="http://search.yahoo.com/mrss/" url="https://noreaq.eu/assets/images/posts_list/kayak_skin.webp" /><media:content medium="image" url="https://noreaq.eu/assets/images/posts_list/kayak_skin.webp" xmlns:media="http://search.yahoo.com/mrss/" /></entry><entry><title type="html">Search for West Greenland Kayak</title><link href="https://noreaq.eu/workshop/2024/04/28/search-for-west-greenland-kayak.html" rel="alternate" type="text/html" title="Search for West Greenland Kayak" /><published>2024-04-28T17:20:43+00:00</published><updated>2024-04-28T17:20:43+00:00</updated><id>https://noreaq.eu/workshop/2024/04/28/search-for-west-greenland-kayak</id><content type="html" xml:base="https://noreaq.eu/workshop/2024/04/28/search-for-west-greenland-kayak.html"><![CDATA[<p>
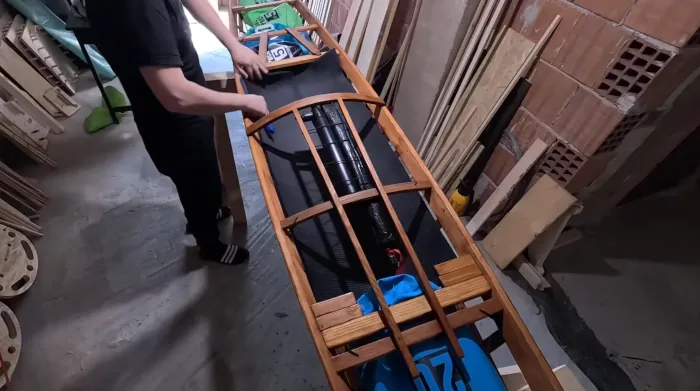
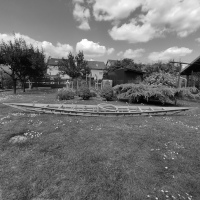
Greenland Kayak. Built by indigenous people of Greenland to hunt and survive in rough sea conditions.</p>

<h2 id="study">Study</h2>

<p>I live in Europe, where ‘skin on frame’ type of construction is not so common, so books were my main source of information.<br />
At first, I found an excellent guide for building a Greenlandic kayak - <strong>‘Instruction in Kayak Building’</strong> by <strong>H.C. Petersen</strong>. This book has very nice and straightforward explanations of Greenlandic kayak construction. It also has some information on sheer line and hull type, but I wanted to know more about these topics as I’ve seen so many different Greenlandic kayaks. I got one more great book: <strong>‘Building the Greenland Kayak’</strong> by <strong>Christopher Cunningham</strong>. This book is full of step-by-step information on how to build a Greenlandic kayak, but besides that, a lot can be learned about working with wood in general and tools that will be of great help. Building the Greenland paddle, tuilik, spray skirt, knots… are some interesting topics too. In short, it’s a must-have book.</p>

<p>While reading the books, I already had two long straight ‘gunwale’ planks and various forms with different angles for experimenting with their angle to find out which sheer line I like the best. Cunningham works with less sheer (straighter sheer) to get a kayak that will have good tracking. This actually bothered me as I wanted to get good tracking but also found that I really like to see more sheer in kayaks—let’s say a little of the ‘banana’ look at the center of the kayak but with low bow and stern ends, so I knew that I’d need to create my own rib measurement system to get the correct hull type with good tracking.</p>

<p>Later, I found out about <strong>Harvey Golden</strong> and his book <strong>‘Kayaks of Greenland’</strong>, which analyzes the history and development of the Greenlandic Hunting Kayak (1600-2000). This book was pure gold for me. There are so many details in this book, and you can actually see how these kayaks evolved through the years and how they are built from region to region. I finally realized how ‘Greenlandic kayak’ is a very broad term.</p>

<p class="post-gallery one"><a href="/assets/images/posts/greenland-kayak/deck/03_books.jpg" data-fslightbox="gallery1"><img src="/assets/images/posts/greenland-kayak/deck/03_books_s.jpg" alt="books" /></a></p>

<p>Despite many beautiful kayaks from all regions of Greenland, Central West (late 1800s through present), Northwest (Disko Bay and North, late 19th through 20th century), and East Greenland (20th century) kayaks (from ‘Kayaks of Greenland’ by Harvey Golden) were the most attractive to me. I wanted a slightly lower volume kayak that would be nice for rolling too, but East Greenland kayaks were simply too low in volume (claustrophobic) for me, so I decided to go with something between East and Central West—Disko Bay models, more precisely 1927-1928 &amp; 1931 as my main inspiration.</p>

<p>In comparison to the rest, these kayaks were a bit shorter and with <strong>lower sheer</strong>. <strong>The cockpit</strong> on these models is usually <strong>aft of center</strong>, which will reduce <strong>weather cocking</strong>. Usually there’s larger space between ribs at the seating position so as not to disturb the thighs underneath.</p>

<p>As most Greenland kayaks had a small beam (breadth), I decided not to go with any type of floorboards or seat but with a foam pad. To get more <strong>stability</strong> because of the kayak’s width, the center of gravity should be as low as possible. Christopher Cunningham writes in his ‘Building The Greenland Kayak’: ‘Floorboards were not common among traditional Greenland kayaks. If the ribs are properly spaced so you are not sitting directly on one or resting your heels on one, the seat is fairly comfortable with just the addition of a hide or foam pad’.
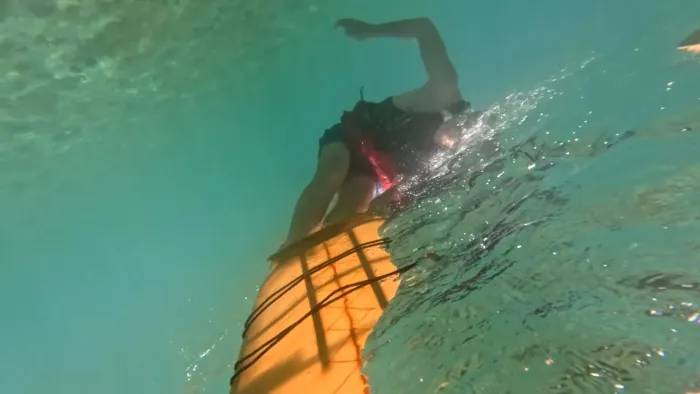
</p>

<p>Because of the <strong>hard chined</strong> ‘V’ bottom hull, it should have good <strong>secondary</strong> (edge) stability, and because of flatter ribs underneath the paddler and aft, the lower deadrise angle should improve <strong>primary</strong> stability too.</p>

<p>Flat (no) rocker at the stern should improve tracking and additionally prevent weather cocking, but with noticeable bow rocker, which I decided to keep, because of maneuverability and it will go over waves more easily.</p>

<p>Other books that I found later and want to mention because they were nice reads too are <strong>‘Eastern Arctic Kayaks’</strong> by <strong>John D. Heath</strong> and <strong>E. Arima</strong> and <strong>‘Building Skin-On-Frame Boats’</strong> by <strong>Robert Morris</strong>.</p>

<h2 id="building-a-greenland-kayak">Building a Greenland kayak</h2>

<h3 id="building-the-deck">Building the deck</h3>

<p>
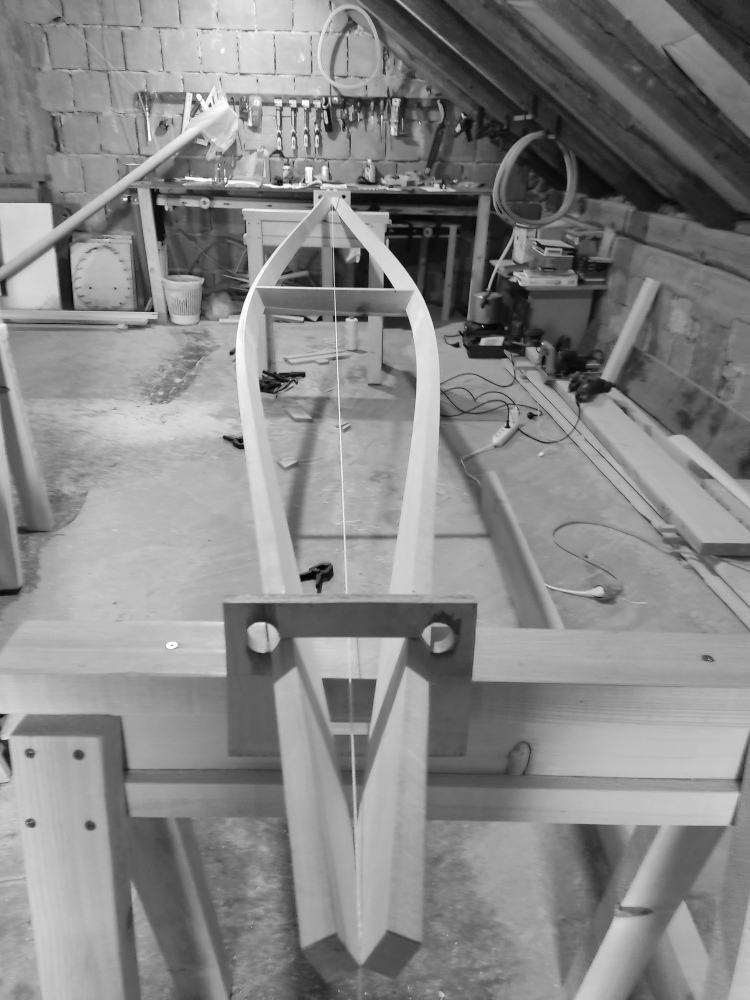
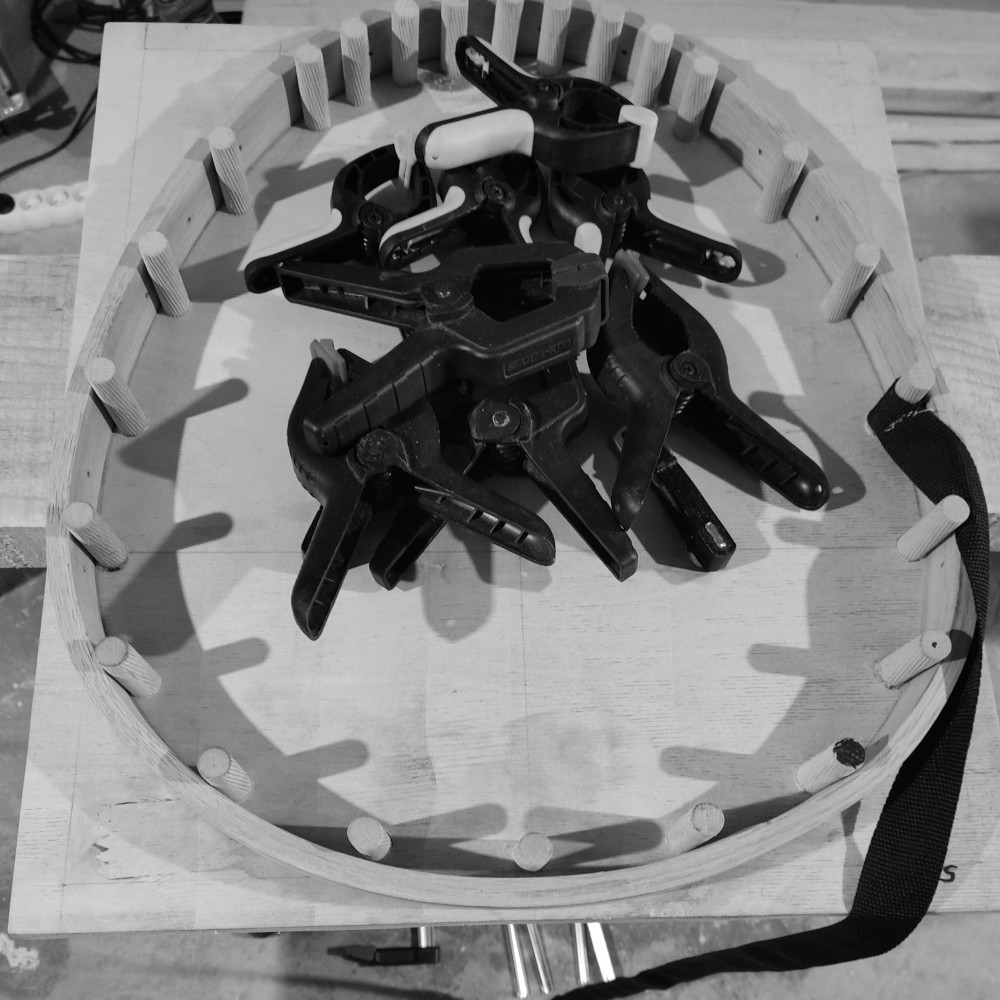
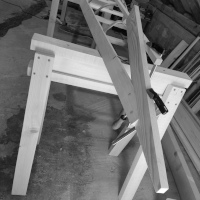
Before setting gunwales into building forms, it’s required to check if they are of <strong>equal strength</strong>. If cut from the same plank, they should be of similar strength. It’s good to overbend the one with more strength and leave it in this position for a while.<br />
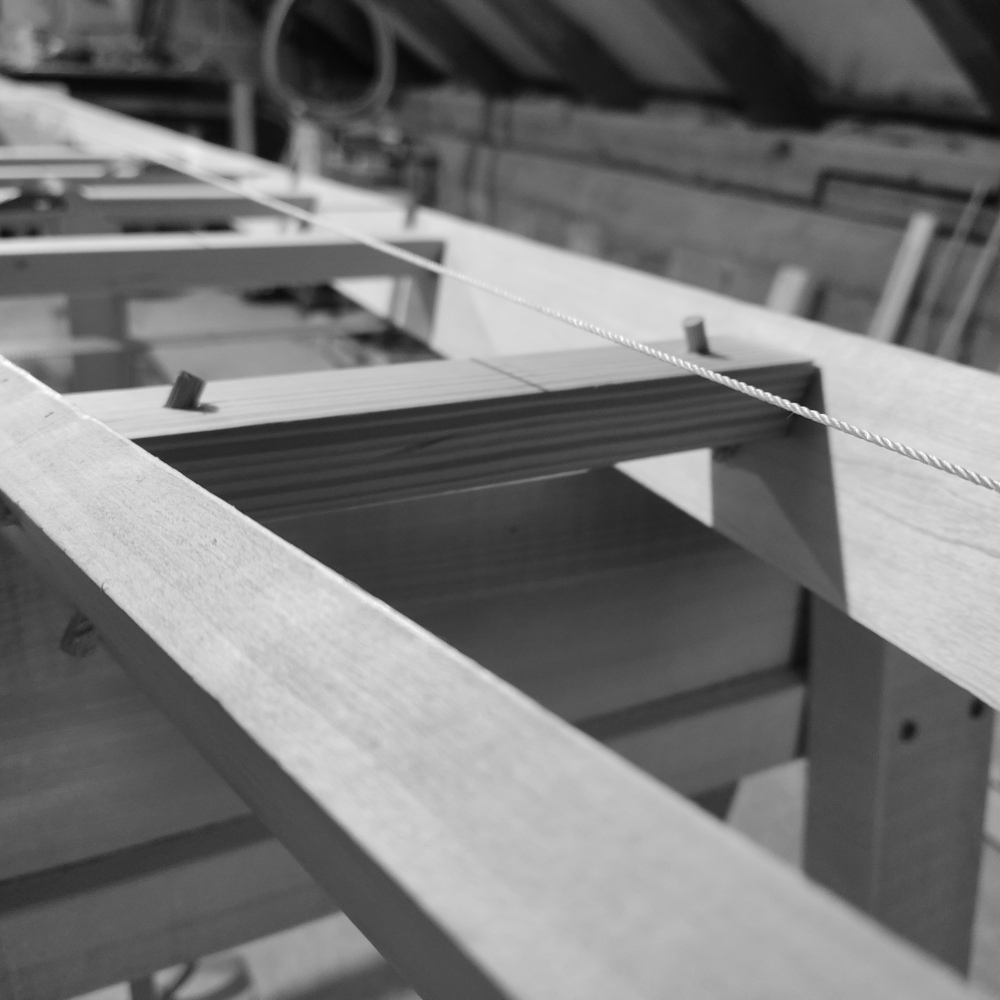
Once the gunwales are set in building forms, it’s time for <strong>symmetry</strong> work. With string attached to gunwale ends, it’s required to measure the distance of both gunwales to the string. More spots are better. In places where the distance is different, the stronger gunwale usually requires some work. Back in the old days, this was resolved “by cutting <strong>transverse grooves</strong> with a knife on the inner surface of the strake at the place where a greater curvature is needed,” writes H.C. Petersen in his “Instruction in Kayak Building.” Today, the <strong>electric planer</strong> is a great tool which can help here.<br />
It’s very important to do this correctly, and the lengths of gunwales should not be altered. They need to be of the same length.
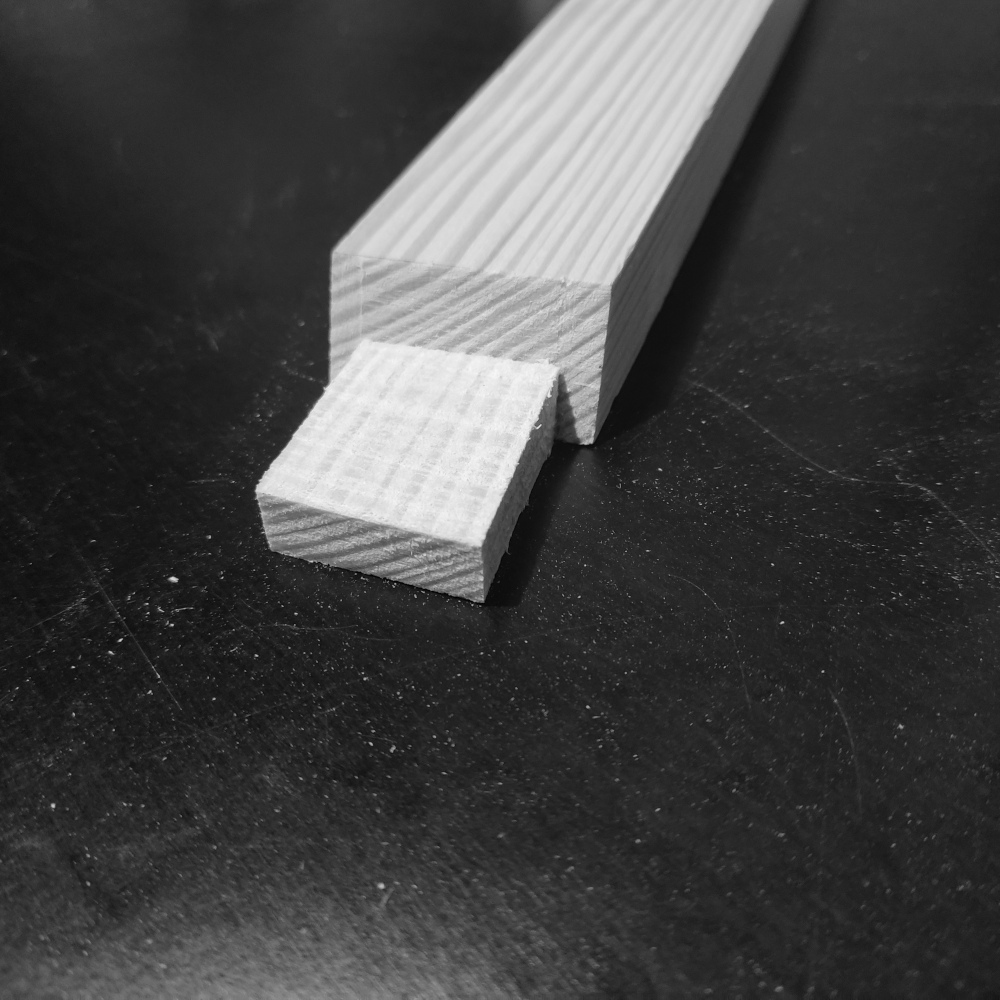
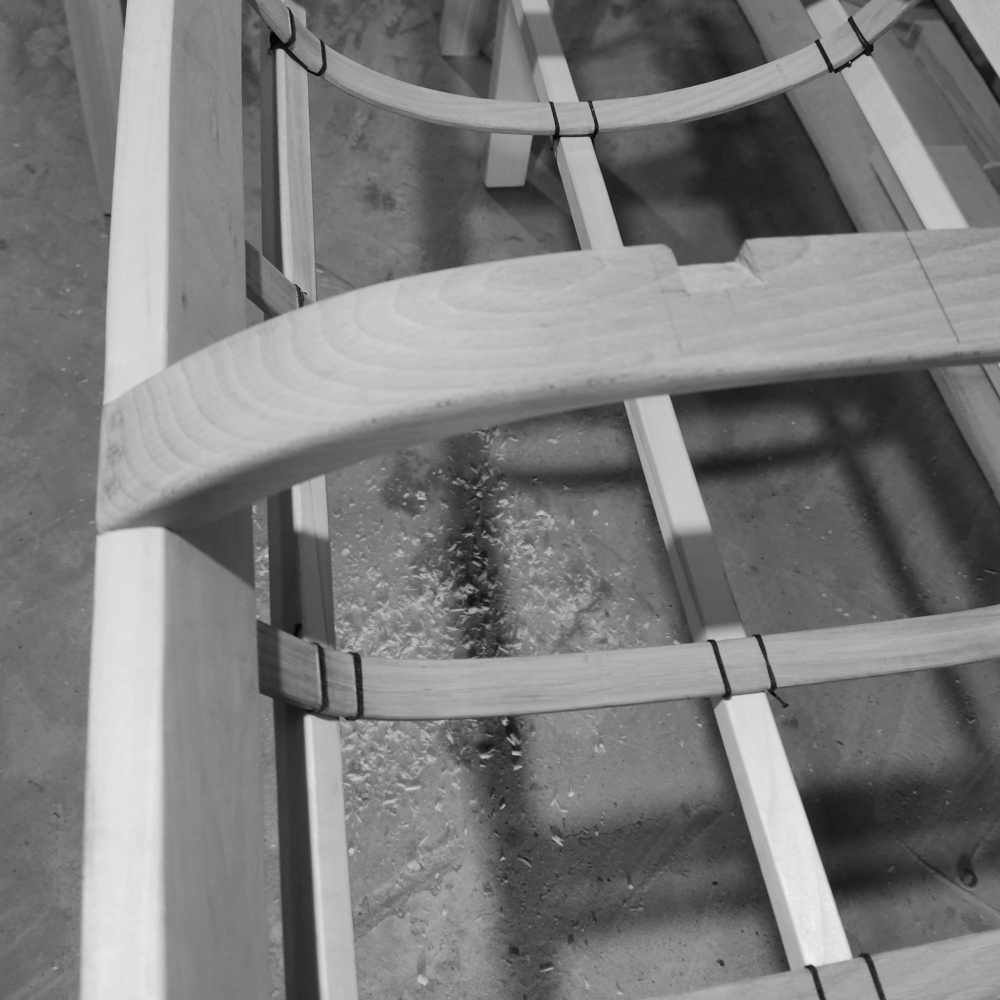
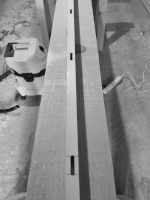
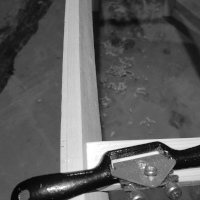
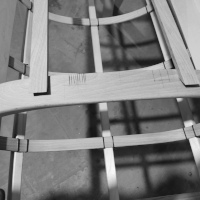
<br />
At <strong>gunwale ends</strong> where they meet each other, it’s required to go with the saw a few times in order to get good contact between them. The image also shows the beveled top of the gunwale, which I do at the end of the deck build.<br />
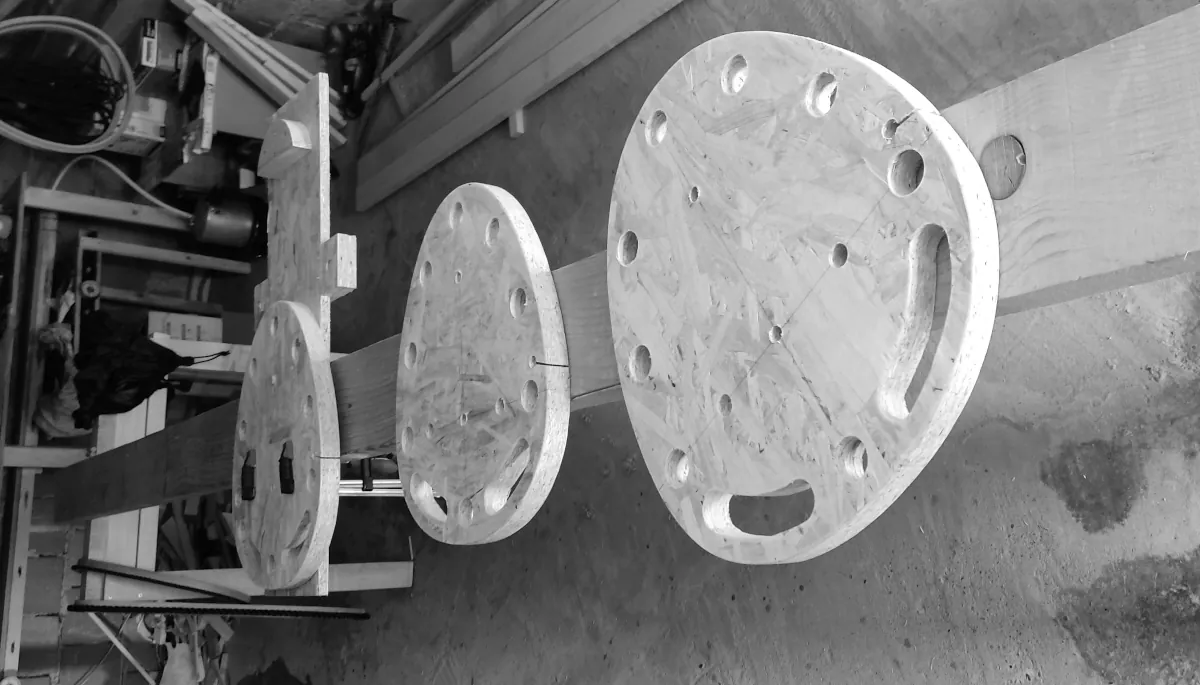
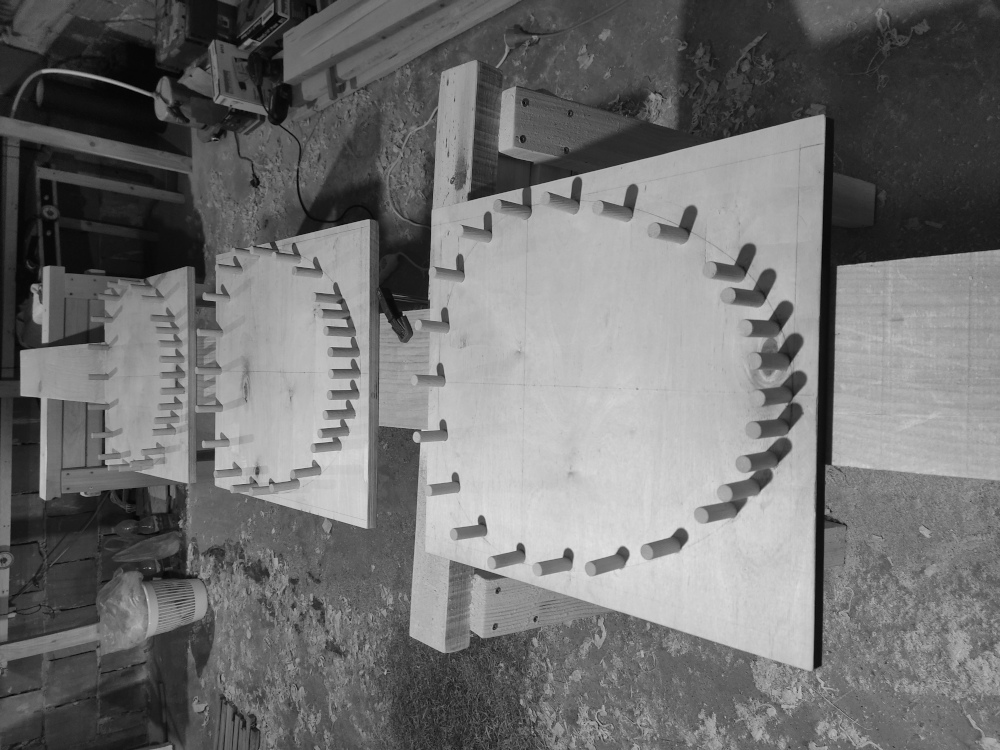
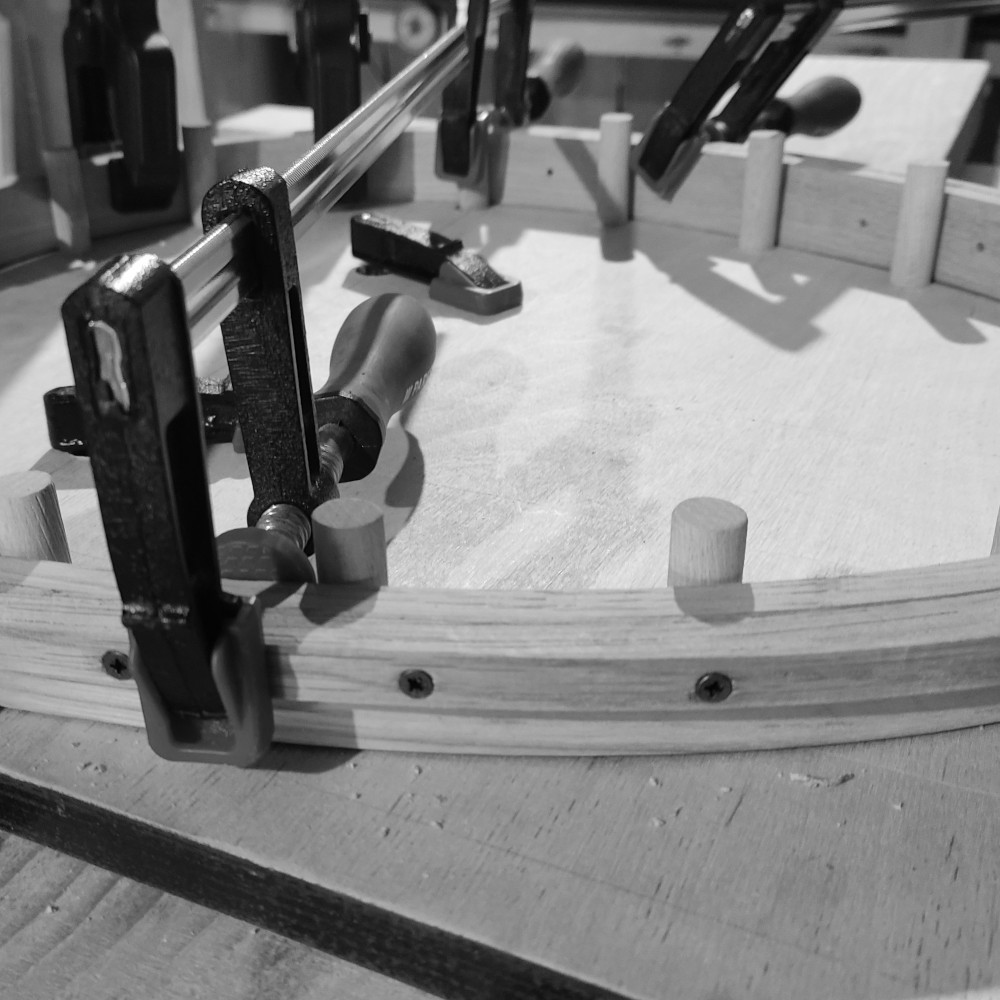
Although it can be done in different ways, I usually do rib and deck beam mortises with my router jigs that I’ve built. It’s much easier this way for me.</p>

<p class="post-gallery three"><a href="/assets/images/posts/greenland-kayak/deck/01_symmetry.jpg" data-fslightbox="gallery2"><img src="/assets/images/posts/greenland-kayak/deck/01_symmetry_s.jpg" alt="symmetry" /></a><a href="/assets/images/posts/greenland-kayak/deck/02_beveled_gunwale_ends.jpg" data-fslightbox="gallery2"><img src="/assets/images/posts/greenland-kayak/deck/02_beveled_gunwale_ends_s.jpg" alt="gunwale_ends" /></a><a href="/assets/images/posts/greenland-kayak/deck/04_rib_mortises.jpg" data-fslightbox="gallery2"><img src="/assets/images/posts/greenland-kayak/deck/04_rib_mortises_s.jpg" alt="rib_mortises" /></a></p>

<p>
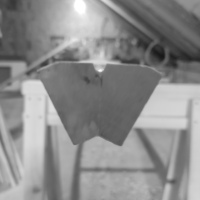
Deck beam tenons are cut with the saw. The angle of these is actually the same angle you would cut mortises for deck beams and the same angle of gunwale building forms. It’s also important to track the curve of the gunwale at the deck beam position so it fits nicely in the mortise.
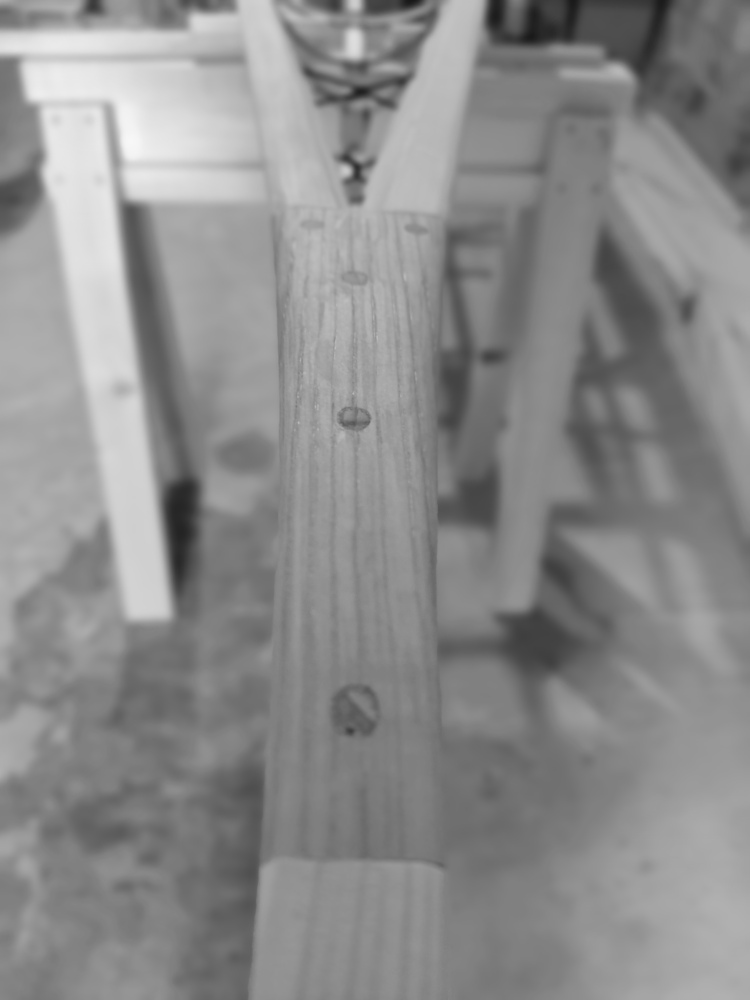
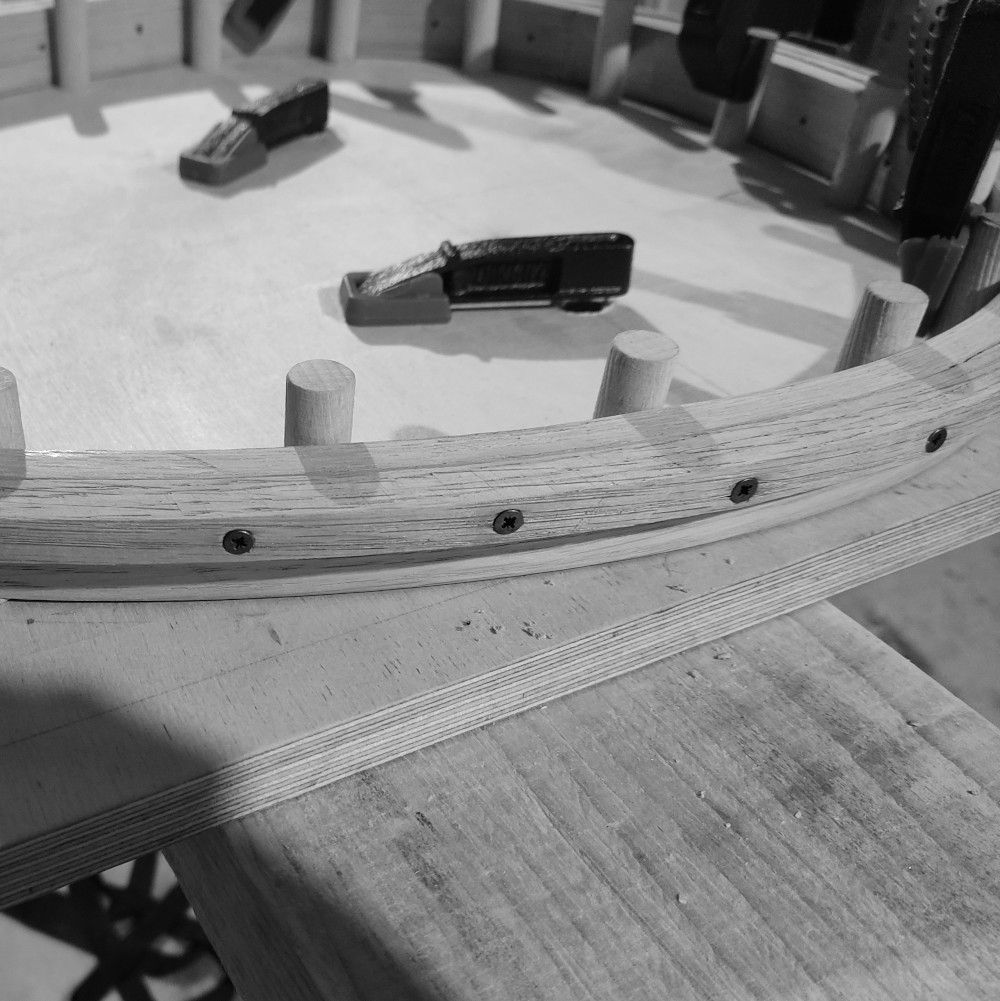
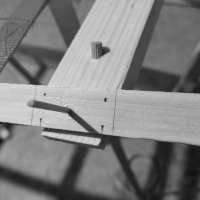
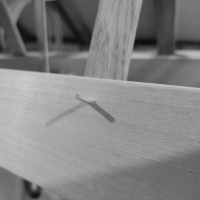
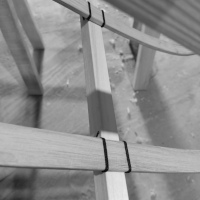
</p>

<p class="post-gallery three"><a href="/assets/images/posts/greenland-kayak/deck/05_making_deck_beam.jpg" data-fslightbox="gallery3"><img src="/assets/images/posts/greenland-kayak/deck/05_making_deck_beam_s.jpg" alt="makind_deck_beams" /></a><a href="/assets/images/posts/greenland-kayak/deck/06_deck_beam_tenons.jpg" data-fslightbox="gallery3"><img src="/assets/images/posts/greenland-kayak/deck/06_deck_beam_tenons_s.jpg" alt="deck_beam_tenons" /></a><a href="/assets/images/posts/greenland-kayak/deck/07_placing_deck_beams.jpg" data-fslightbox="gallery3"><img src="/assets/images/posts/greenland-kayak/deck/07_placing_deck_beams_s.jpg" alt="placing_deck_beams" /></a></p>

<p>To lock the gunwales at this angle, <strong>lashing</strong> or <strong>pegging</strong> of deck beams is mostly used. I usually use pegging here: one 6mm angled peg through the deck beam and gunwale, and just in case, one 3mm peg through the gunwale and deck beam tenon. This is a combination of two pegging methods that I found in “Kayaks of Greenland” by Harvey Golden. I had some hard time finding these smaller pegs while they were the whole time in front of me. Who would know that these are barbecue sticks! Later during skinning (I’m skinning on wet), I realized these 3mm pegs can actually jump out a little bit because of moisture during skinning, which is not good because of abrasion at these places, so I actually stick with the <strong>angled pegs</strong> method only, additionally secured with smaller pegs through the gunwale bottom and larger pegs, which are used occasionally.
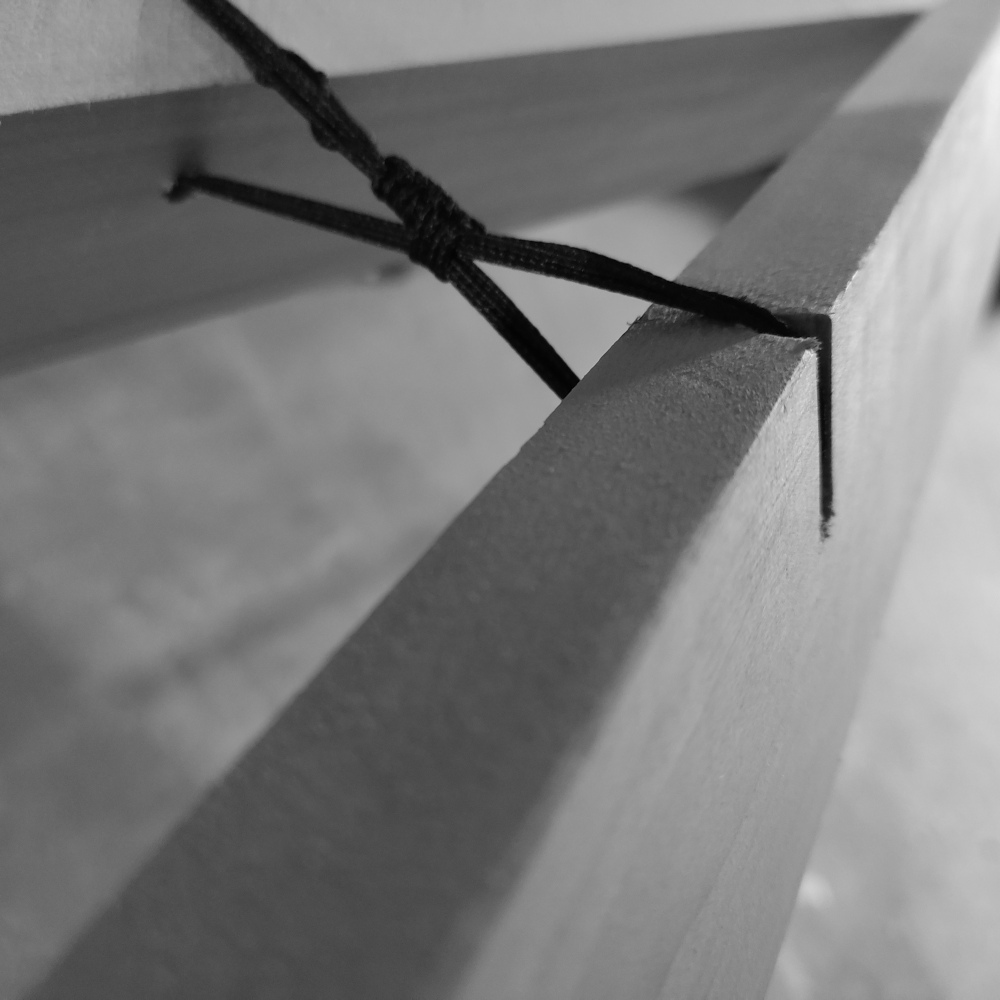
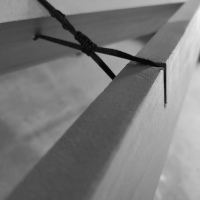
<br />
Additionally, <strong>gunwale ends</strong> need to be locked too, so it’s done with trunnels and an H-X knot. As mentioned earlier, “Building the Greenland Kayak” by Christopher Cunningham is full of great information, and this goes for different types of knots which are used. After a few runs of lashing through holes and the gunwale bottom, a few half hitches are thrown around both parts (H), and after tightening them, an X is formed. A few additional half hitches at one side are required in order to prevent this knot from loosening. This knot is very strong—so strong that if done too tight, it can actually cause wood to split. <strong>Small grooves</strong> in gunwales are done with the chisel so lashing cannot protrude into the skin because of abrasion.</p>

<p class="post-gallery three"><a href="/assets/images/posts/greenland-kayak/deck/08_pegging_deck_beams.jpg" data-fslightbox="gallery4"><img src="/assets/images/posts/greenland-kayak/deck/08_pegging_deck_beams_s.jpg" alt="makind_deck_beams" /></a><a href="/assets/images/posts/greenland-kayak/deck/09_pegging_deck_beams.jpg" data-fslightbox="gallery4"><img src="/assets/images/posts/greenland-kayak/deck/09_pegging_deck_beams_s.jpg" alt="deck_beam_tenons" /></a><a href="/assets/images/posts/greenland-kayak/deck/10_gunwales_locking.jpg" data-fslightbox="gallery4"><img src="/assets/images/posts/greenland-kayak/deck/10_gunwales_locking_s.jpg" alt="placing_deck_beams" /></a></p>

<p>
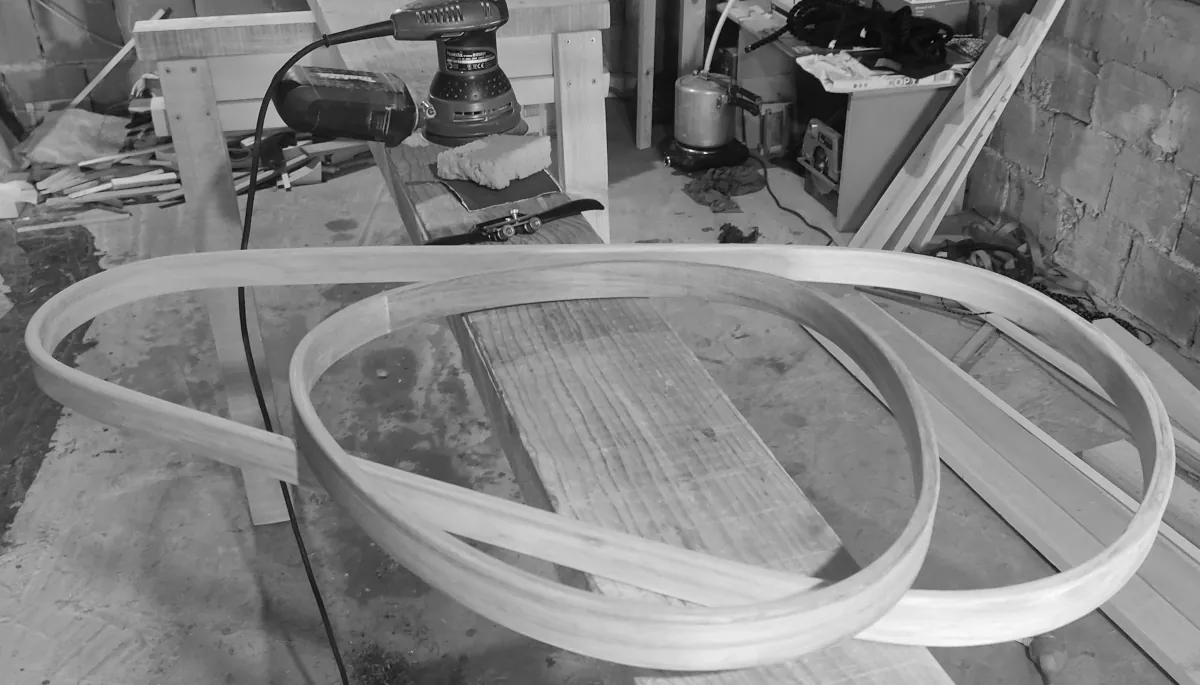
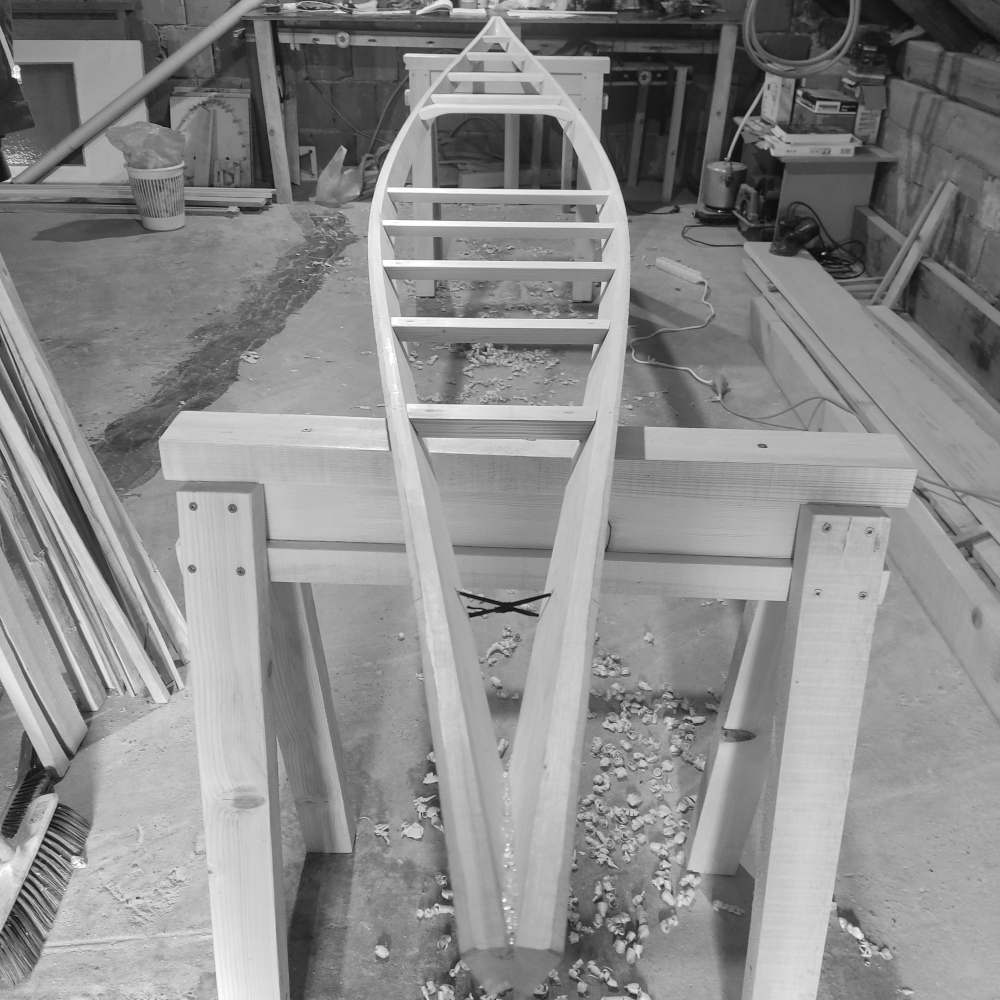
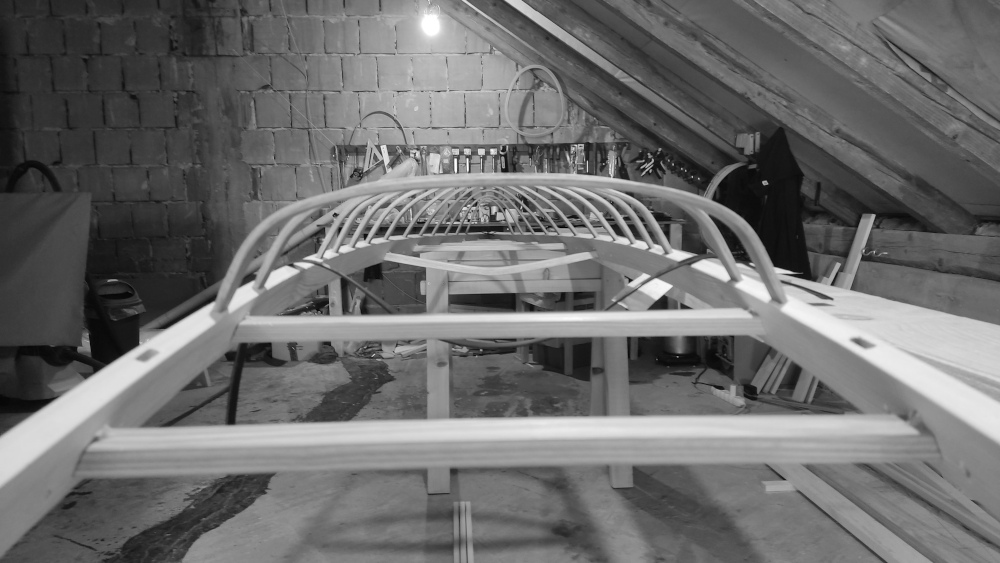
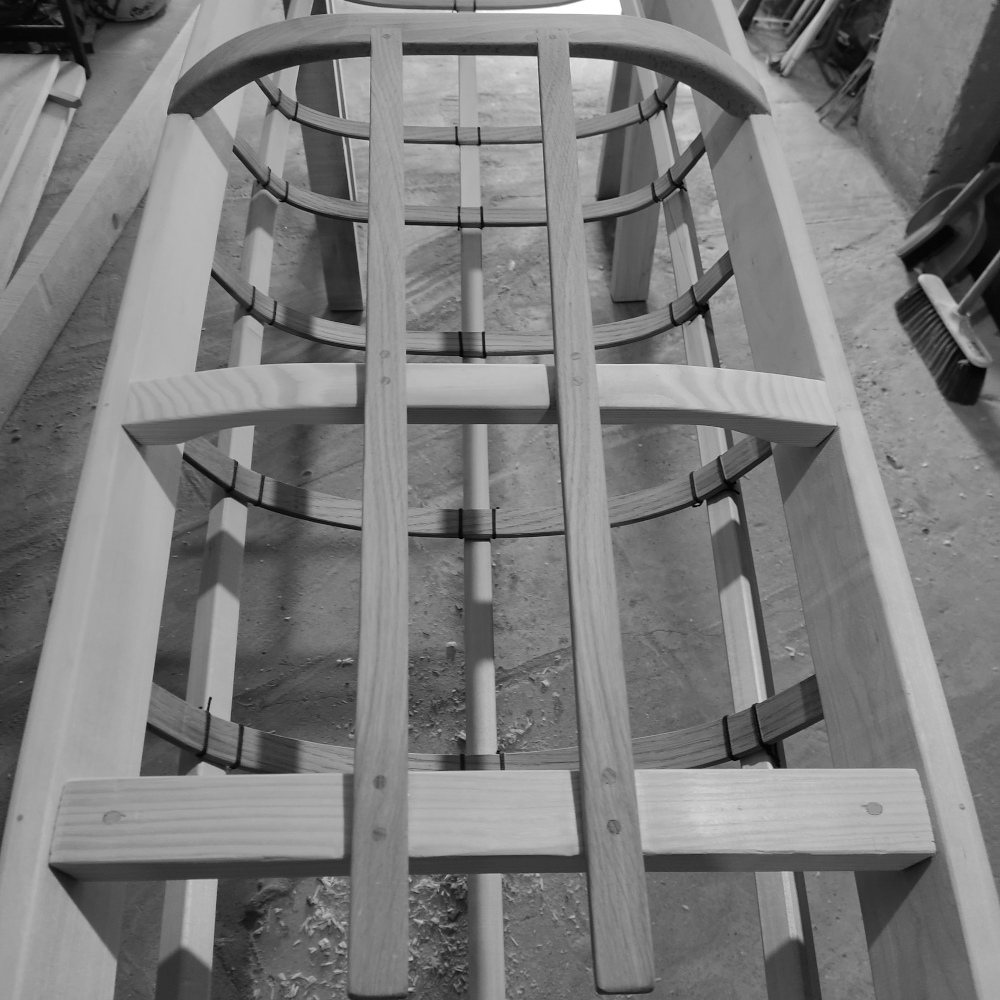
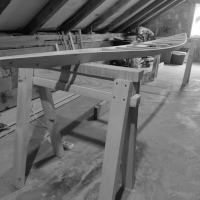
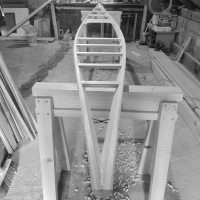
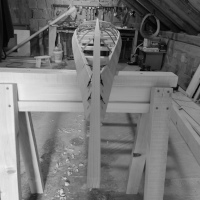
After beveling the gunwale top with a block plane or spokeshave and sanding sharp edges, the deck part of the kayak is mostly done. Deck stringers/ridges, stem plates, and masik will be added later, after the hull is done. This was my first frame actually, and now I see that I built a curved deck beam from a piece of wood using a band saw. Later I started to use <strong>steam-bent</strong> Slavonian oak for it. At first I was annoyed because there is always a bit of wood spring-back, but with a few hits and misses I got the right shape of my steam bend form, so front deck stringers nicely sit on the masik/curved deck beam. Oak is very strong, so I actually reduced its thickness for easier bending and a little bit more leg room.
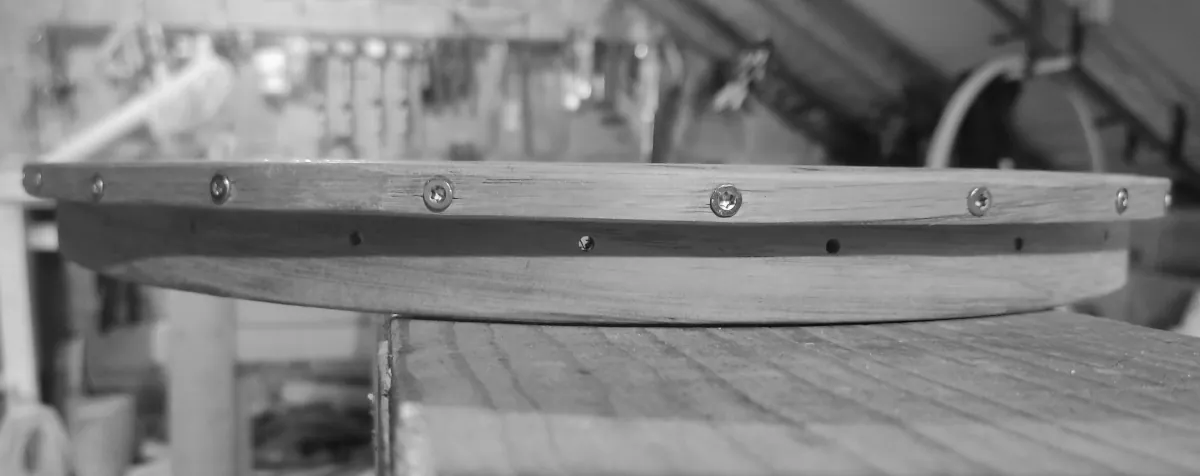
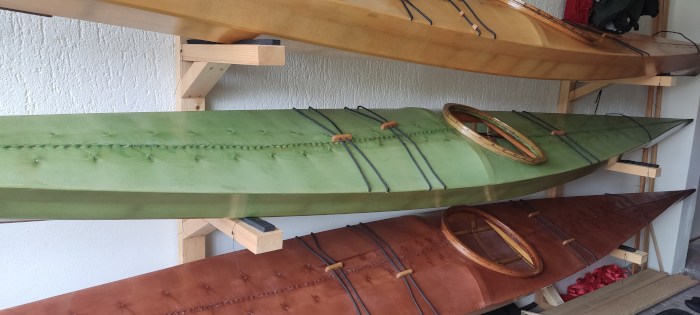
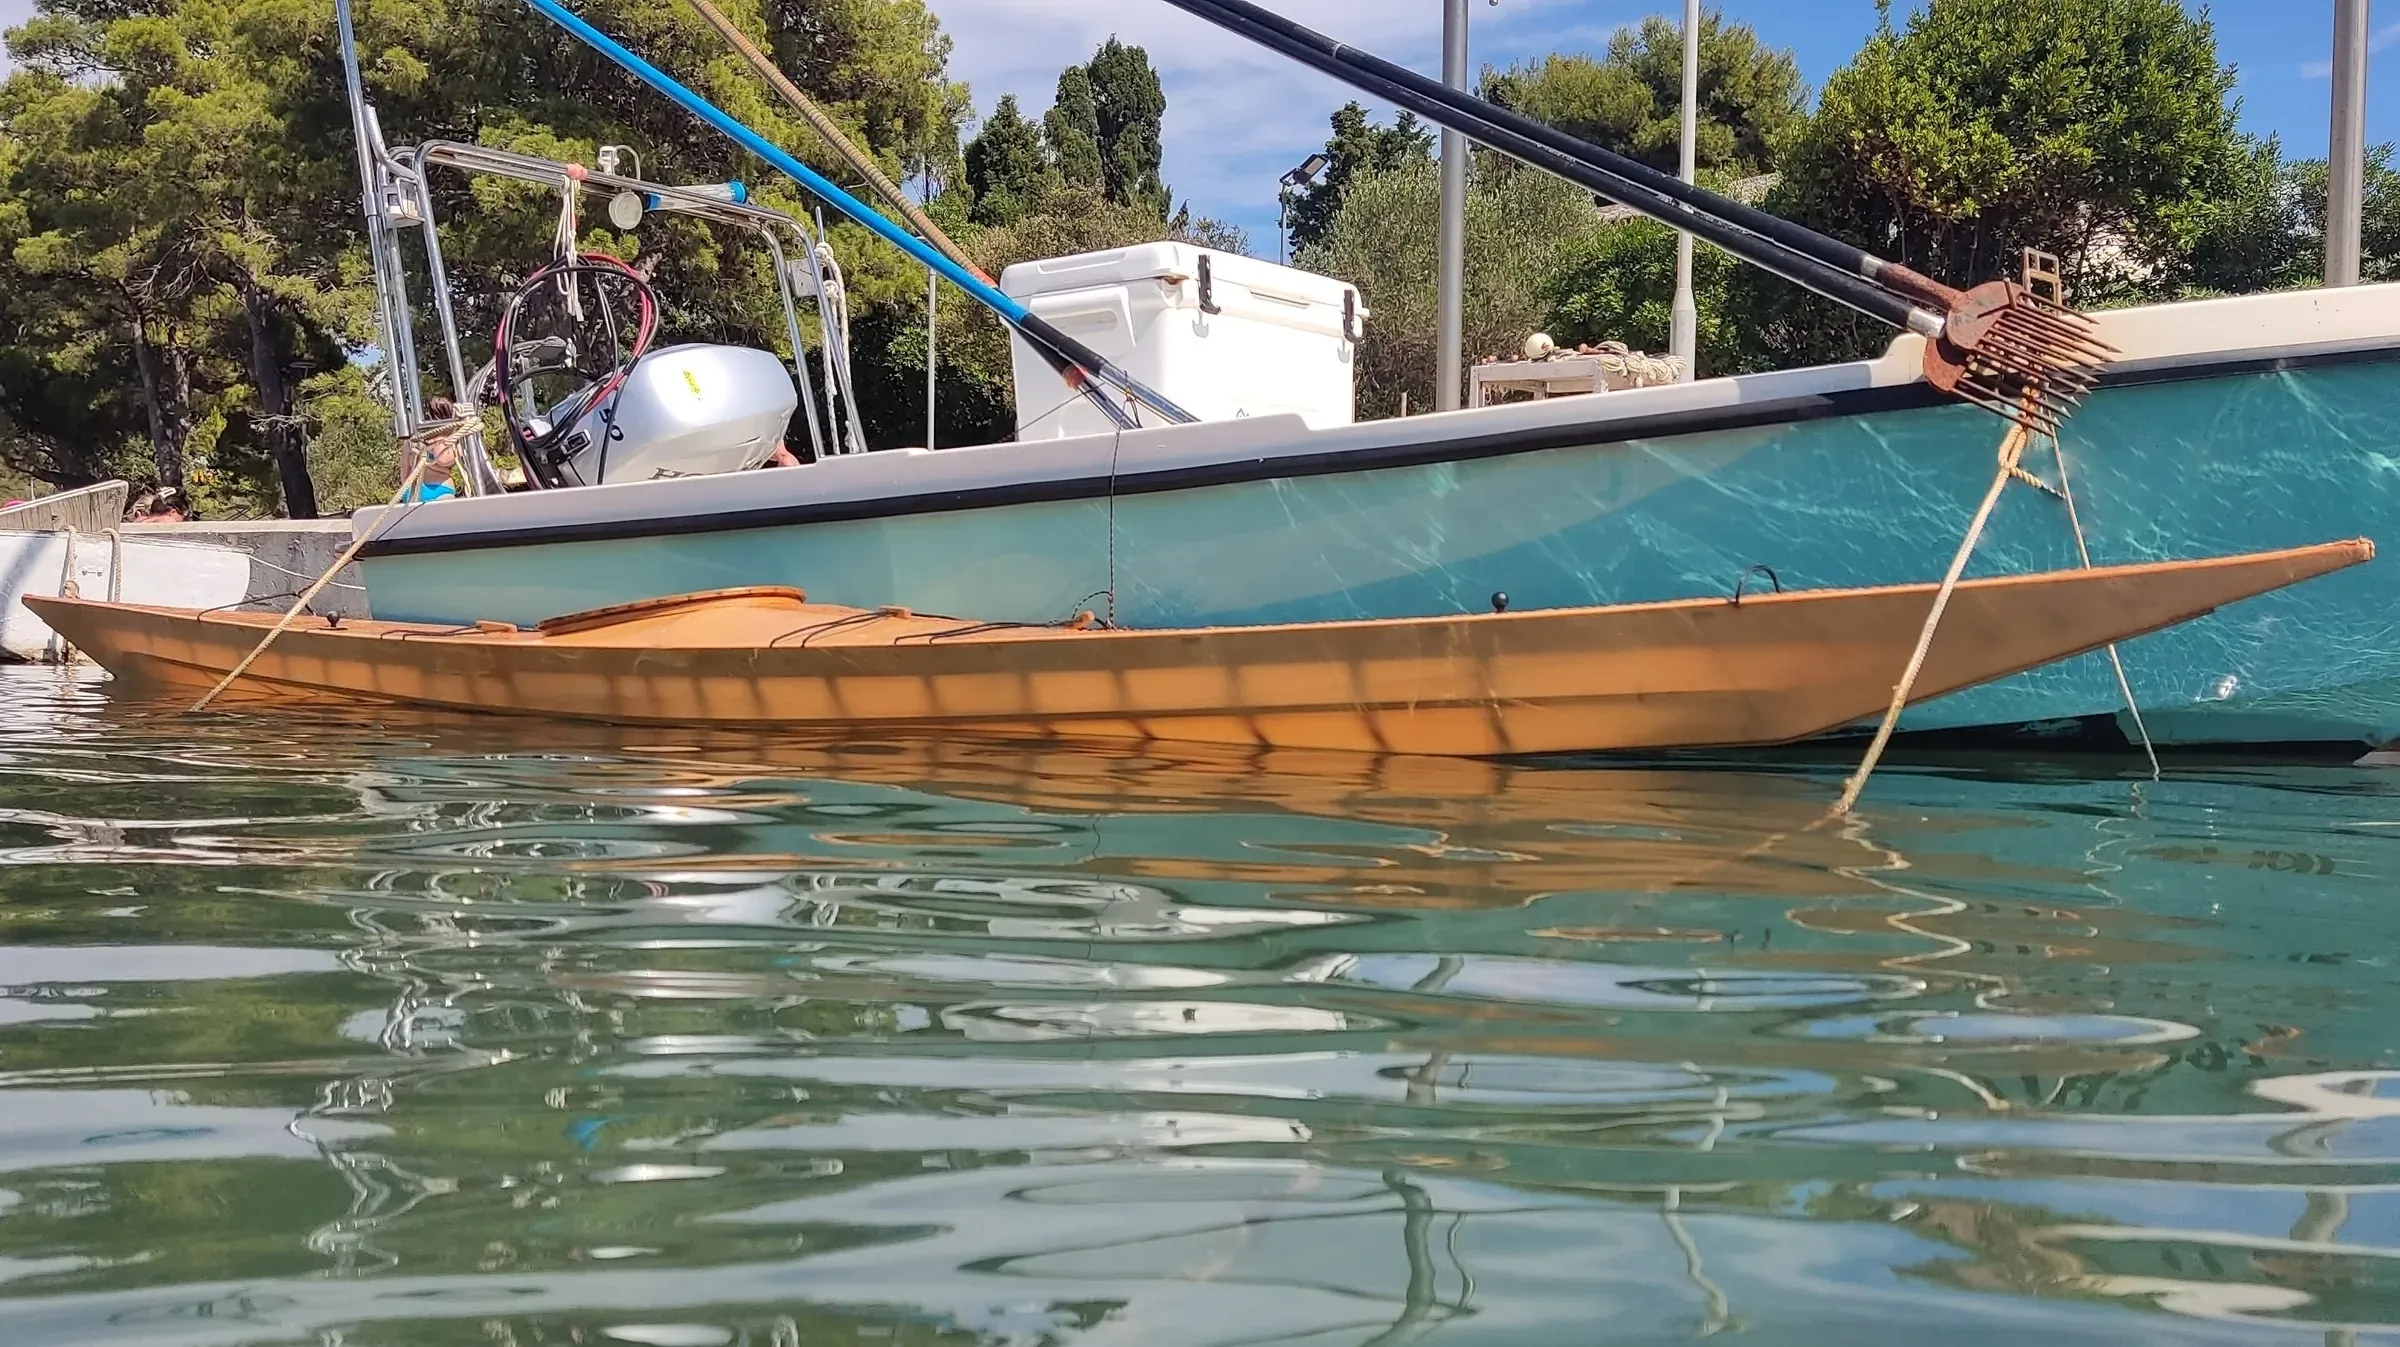
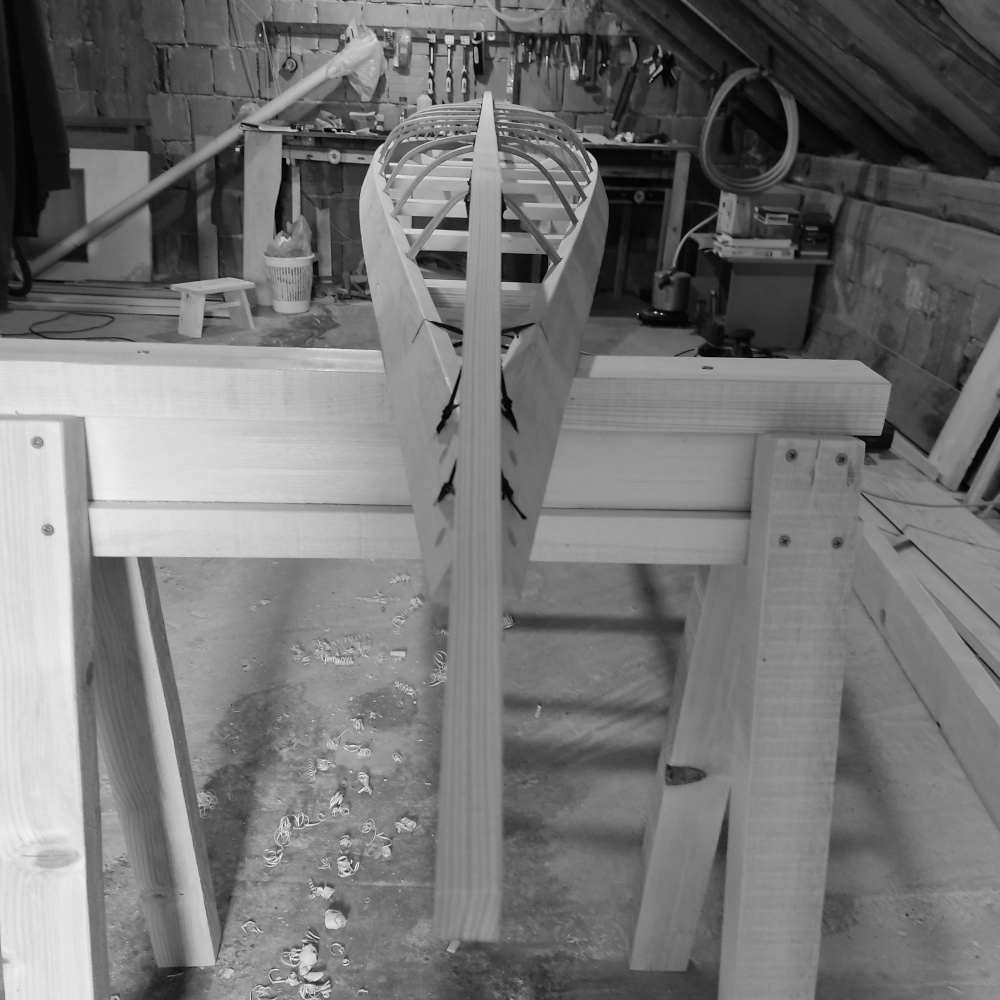
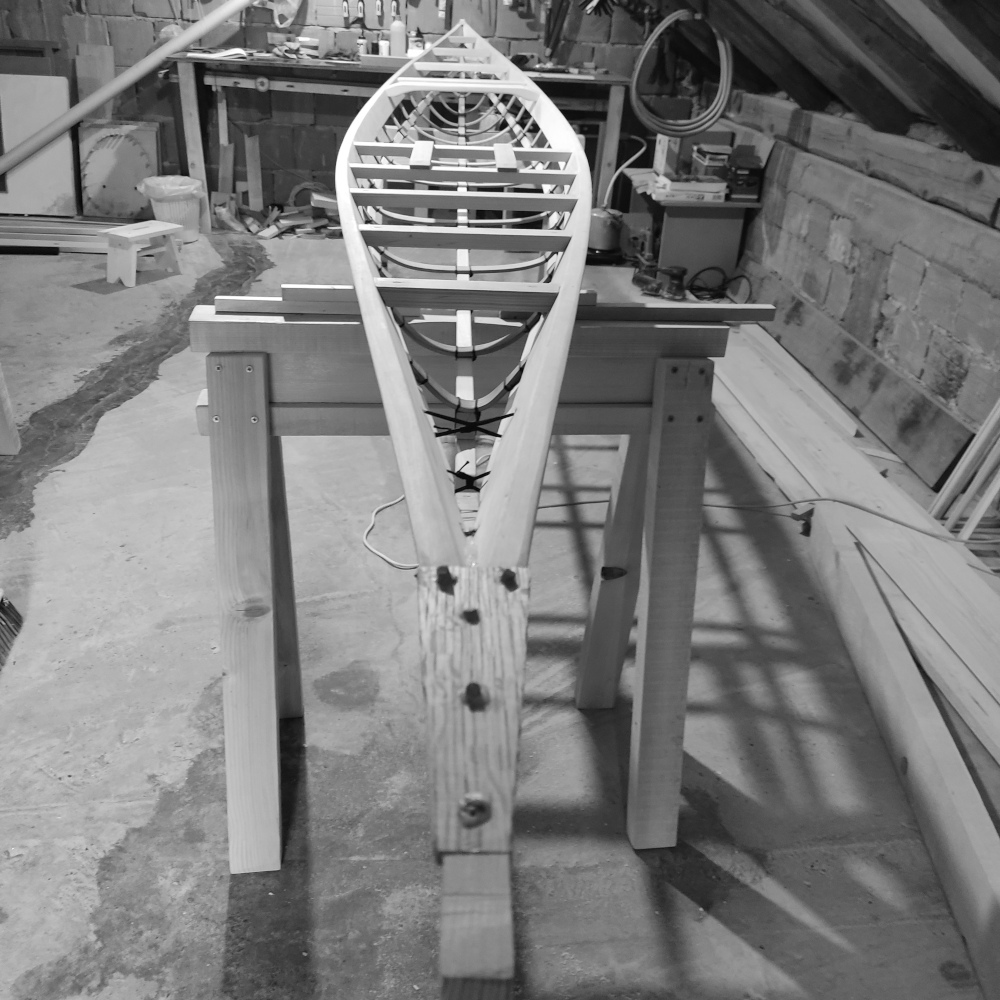
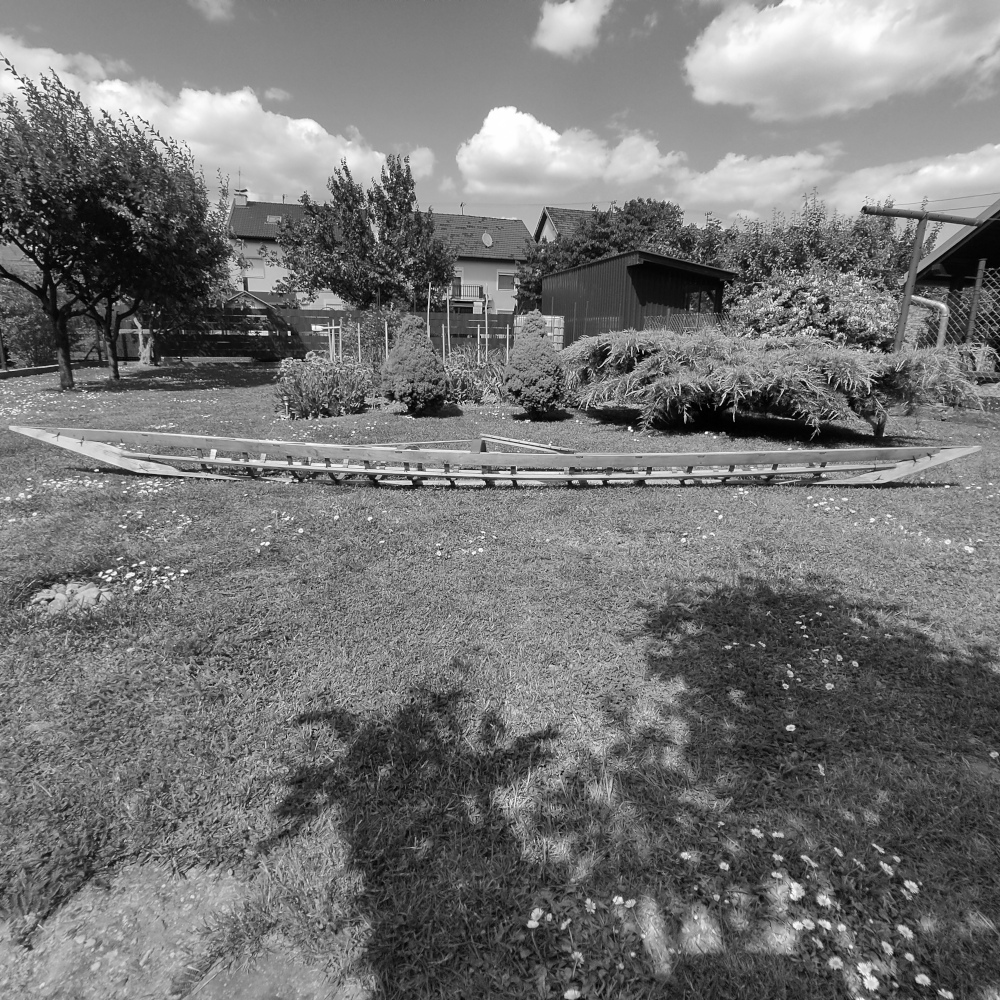
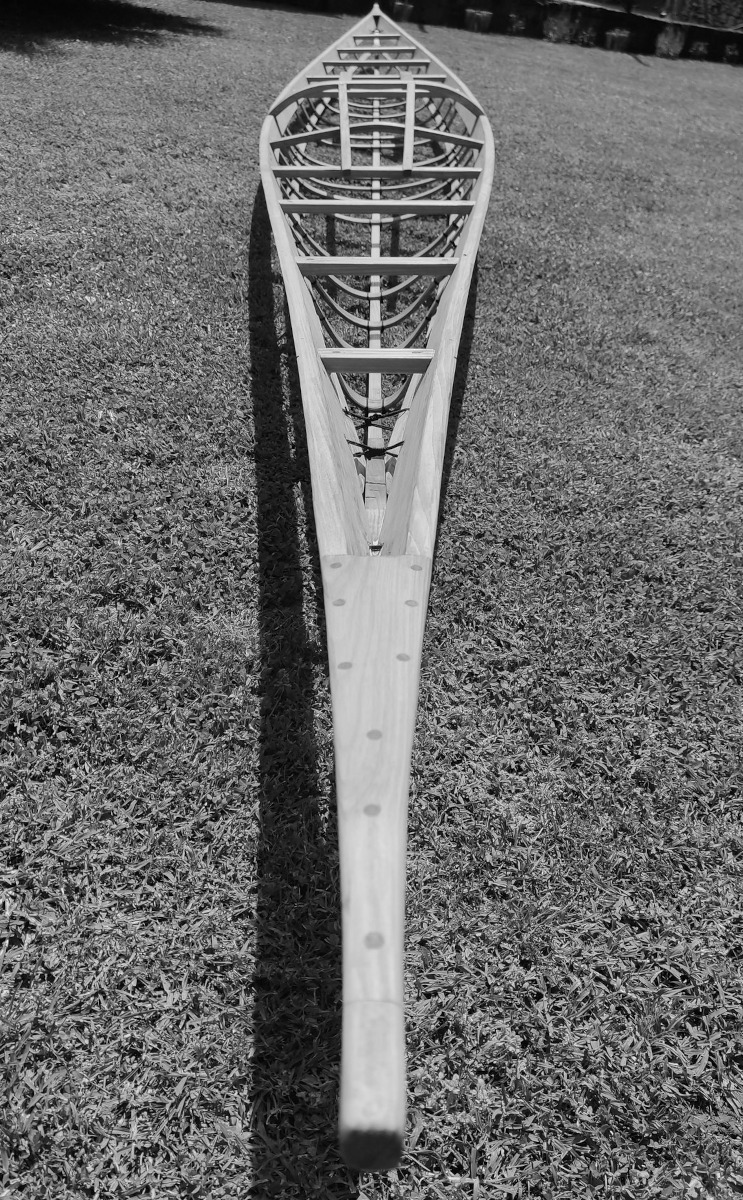
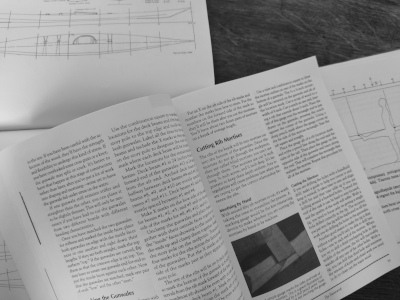
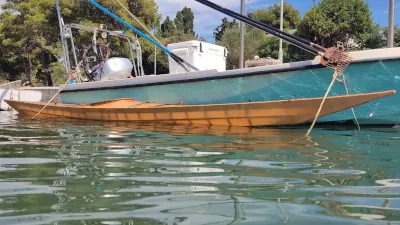
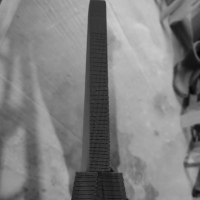
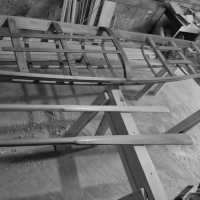
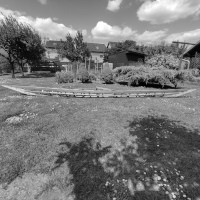
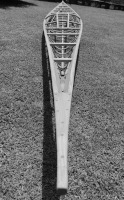
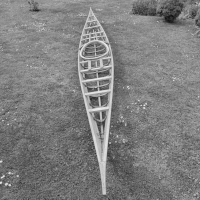
<br />
The first image shows the <strong>sheer line</strong> and stem shape. This naturally created low stem profile by gunwale flare is something that is the most appealing to me. Although more found on East Greenland kayaks, I decided to leave it this way. On my later builds, I decided to add more height to the bow and a bit more height to the stern, closer to the original, in order to get more of this West Greenland type (last image of finished kayak, actually my last build: 520cm length overall, 53cm beam, and 12kg weight). This higher bow will be a little bit <strong>more affected by wind</strong>, but because of additional buoyancy, it will also <strong>recover</strong> a little bit more quickly if it’s submerged by a wave.</p>

<p class="post-gallery three"><a href="/assets/images/posts/greenland-kayak/deck/11_framework.jpg" data-fslightbox="gallery5"><img src="/assets/images/posts/greenland-kayak/deck/11_framework_s.jpg" alt="framework" /></a><a href="/assets/images/posts/greenland-kayak/deck/13_beveling_gunwale_top.jpg" data-fslightbox="gallery5"><img src="/assets/images/posts/greenland-kayak/deck/13_beveling_gunwale_top_s.jpg" alt="beveling_gunwale_top" /></a><a href="/assets/images/posts/greenland-kayak/deck/12_framework.jpg" data-fslightbox="gallery5"><img src="/assets/images/posts/greenland-kayak/deck/12_framework_s.jpg" alt="framework" /></a></p>

<p class="post-gallery two"><a href="/assets/images/posts/greenland-kayak/deck/14_frame_arched_deck_beam.jpg" data-fslightbox="gallery6"><img src="/assets/images/posts/greenland-kayak/deck/14_frame_arched_deck_beam_s.jpg" alt="arched_deck_beam" /></a><a href="/assets/images/posts/greenland-kayak/deck/15_higher_bow.webp" data-fslightbox="gallery6"><img src="/assets/images/posts/greenland-kayak/deck/15_higher_bow_s.webp" alt="high_bow" /></a></p>

<h3 id="building-the-hull">Building the hull</h3>

<p>As mentioned before, I knew this would be a longer trip through kayak hull and ribs because I did not work with any type of kayak plans, so I needed to make my rib measuring system. Something very helpful was again “Building the Greenland Kayak” by Christopher Cunningham, in which he uses <strong>“ribs” made of wire</strong> in order to see how the ribs will look. Once I did it and measured wire lengths, I noticed that the statement by H.C. Petersen in his “Instruction in Kayak Building”—”the width of the kayak at the position where the rib is to be placed + 4 fingers on each side”—principle was very true in order to get a nice shape of the hull. With exceptions of course, especially when you start approaching the stems in order to get desired rocker. This “4 finger” constant is also adapted because of different gunwale size and desired depth of the kayak.<br />
For rib stock, oak or ash are preferred. I’m using mostly <strong>green oak</strong>, and if I can’t find it for some reason, I’m using <strong>kiln-dried oak</strong>. Kiln-dried oak would need a few days of soaking in water before you can do the steam bending; otherwise, you’ll break many of them. Believe me! :) Once the ribs are bent into shape, I peg the ribs with small wooden pegs. I’m not sure I will do this on my next builds because there is no way that a rib can jump out from its mortise after frame lashing, not to mention the additional force by the skin. Harvey Golden in his “Kayaks of Greenland” writes, “Ribs are not always fastened into their mortises, but when they are, the common method seems to be via small pegs…”</p>

<p class="post-gallery three"><a href="/assets/images/posts/greenland-kayak/hull/02_hull.jpg" data-fslightbox="gallery7"><img src="/assets/images/posts/greenland-kayak/hull/02_hull_s.jpg" alt="hull" /></a><a href="/assets/images/posts/greenland-kayak/hull/03_pegging_ribs.jpg" data-fslightbox="gallery7"><img src="/assets/images/posts/greenland-kayak/hull/03_pegging_ribs_s.jpg" alt="pegging_ribs" /></a><a href="/assets/images/posts/greenland-kayak/hull/04_bent_ribs.jpg" data-fslightbox="gallery7"><img src="/assets/images/posts/greenland-kayak/hull/04_bent_ribs_s.jpg" alt="bent_ribs" /></a></p>

<p>
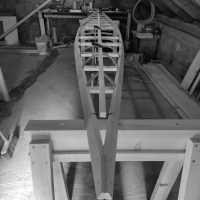
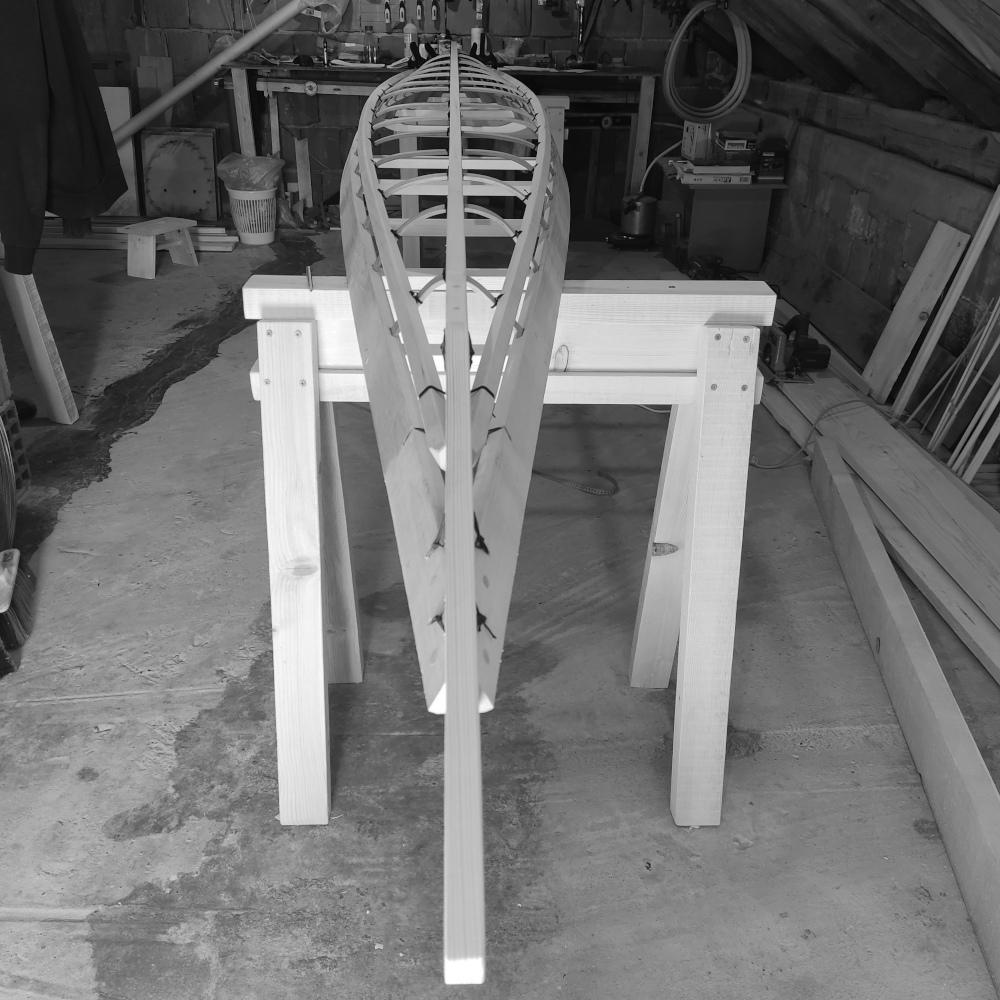
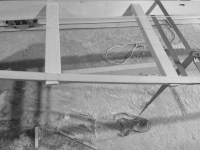
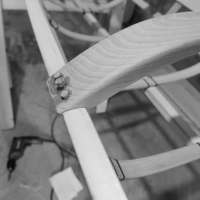
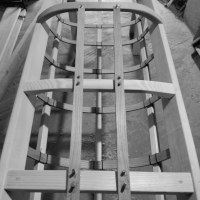
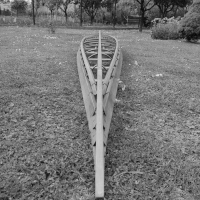
Attaching stems. A fairing block can be seen on the last rib between the keelson. Although perfectly normal for skin-on-frame kayak builds, my rib system constantly evolves from frame to frame so I’m using less of it, and this frame was my first actually. The last rib got a slightly different position later, away from the stem, in order to get more height without cracking the rib, because very sharp bending is required here.
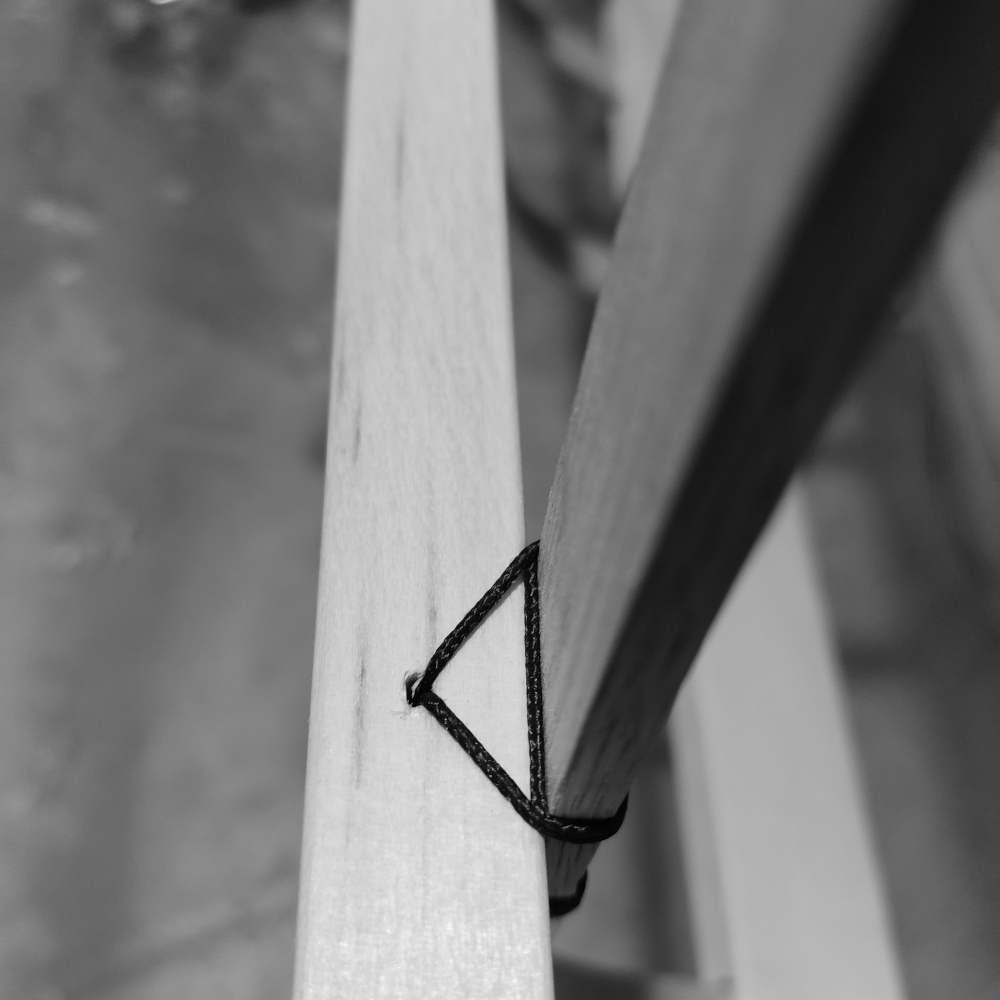
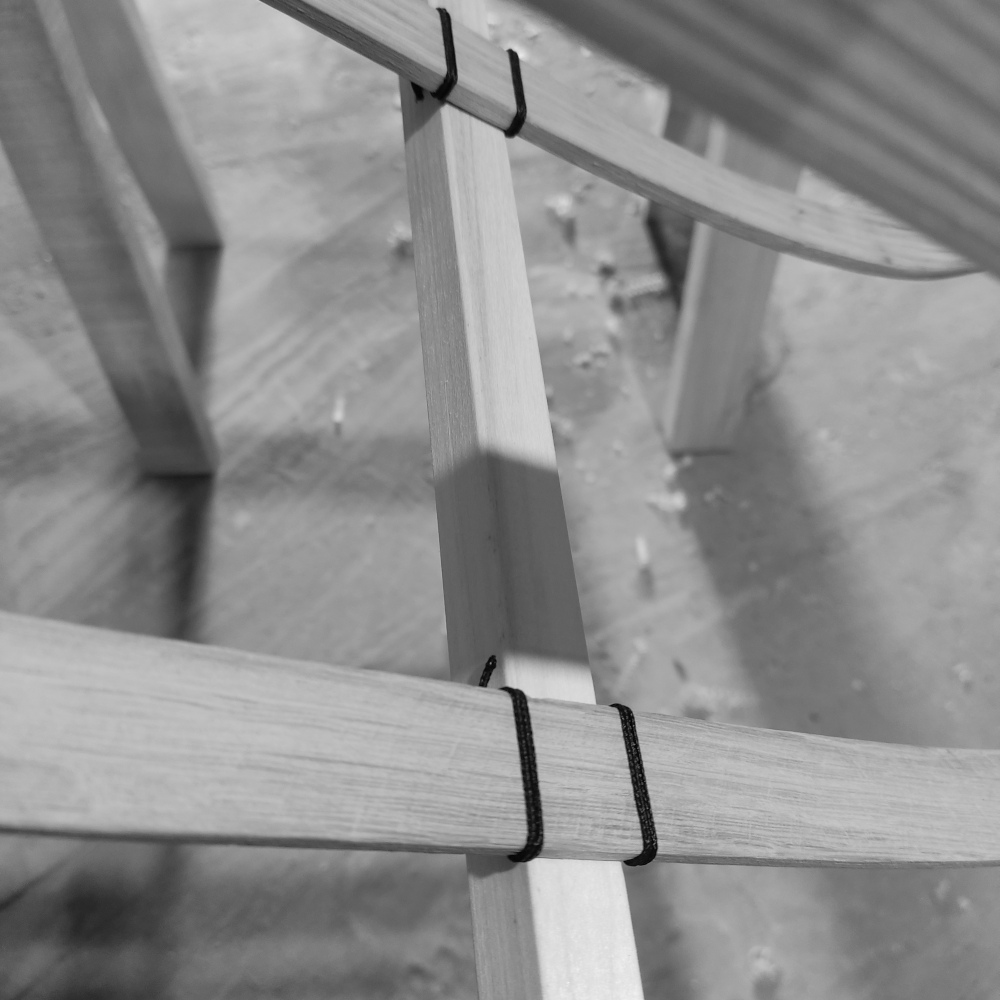
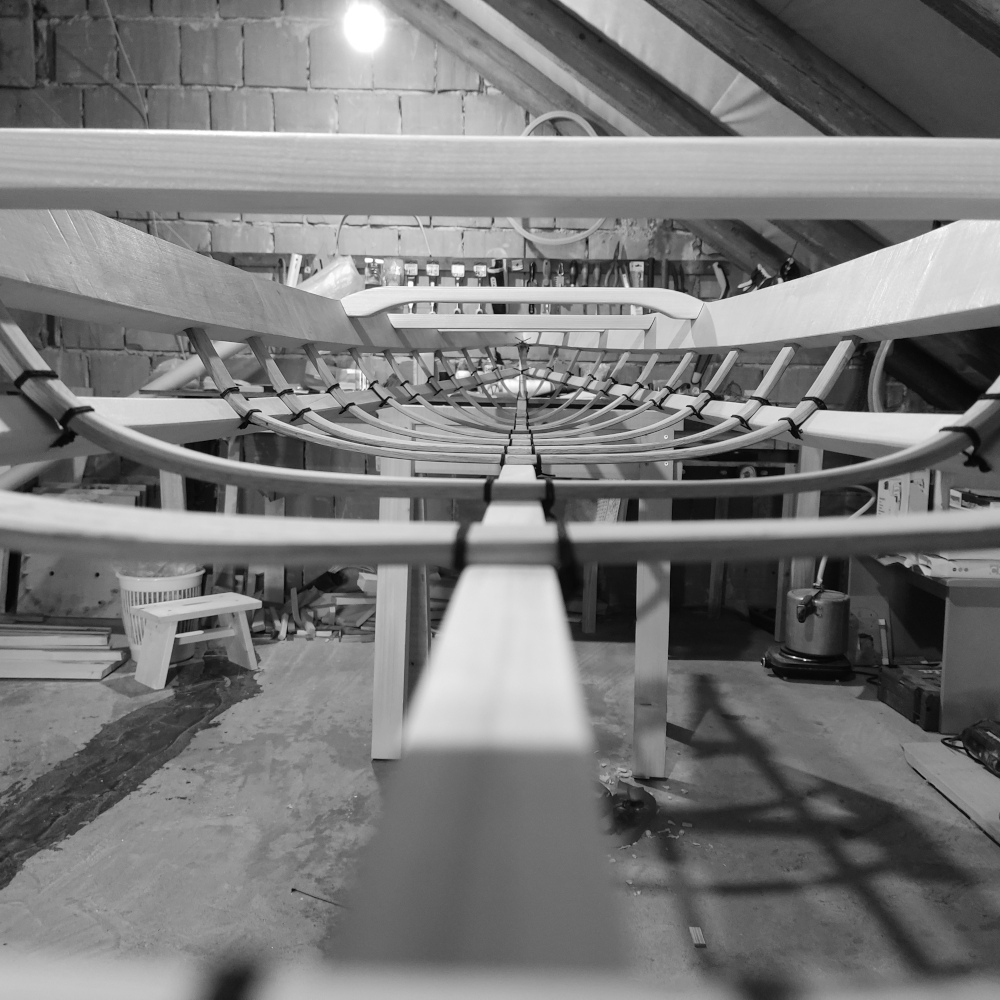
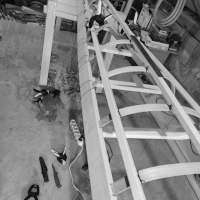
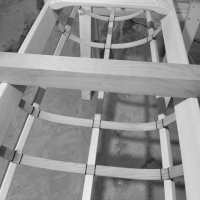
<br />
<strong>Rib lashing</strong>. Back in the days, <strong>sinew</strong>—made from animal tendons—was used and was very strong. Artificial sinew (waxed polyester thread), which is mostly used today, is not so common in Europe. I’m using very <strong>strong polyester thread</strong> of 1.3mm which is used mostly in sea fishing as a main line in longline fishing. Breaking strength is around <strong>60kg</strong>. I lash every rib separately—a lot of work, I must say. Maybe I’ll switch to continuous lashing, as both methods are used in Greenland kayaks, although continuous lashing was more common. The thread does not go around the keelson and chines but through the hole at every rib position so the thread <strong>does not protrude</strong> into the skin later. This would not be good because of <strong>abrasion</strong>. In <strong>‘Kayaks of Greenland’</strong>, Harvey Golden writes that “Lashings as a rule do not go around the outside face of the keelson or chines. Instead, the lines pass through holes drilled through the respective pieces.” (p.66). The knot is actually V-Y, which I tie at one side of the keel with a few half hitches. With two loops around ribs, I guess it looks nice from the top.</p>

<p class="post-gallery three"><a href="/assets/images/posts/greenland-kayak/hull/05_adding_stems.jpg" data-fslightbox="gallery8"><img src="/assets/images/posts/greenland-kayak/hull/05_adding_stems_s.jpg" alt="attaching_stems" /></a><a href="/assets/images/posts/greenland-kayak/hull/06_rib_lashing.jpg" data-fslightbox="gallery8"><img src="/assets/images/posts/greenland-kayak/hull/06_rib_lashing_s.jpg" alt="rib_lashing" /></a><a href="/assets/images/posts/greenland-kayak/hull/07_rib_lashing.jpg" data-fslightbox="gallery8"><img src="/assets/images/posts/greenland-kayak/hull/07_rib_lashing_s.jpg" alt="rib_lashing" /></a></p>

<p>
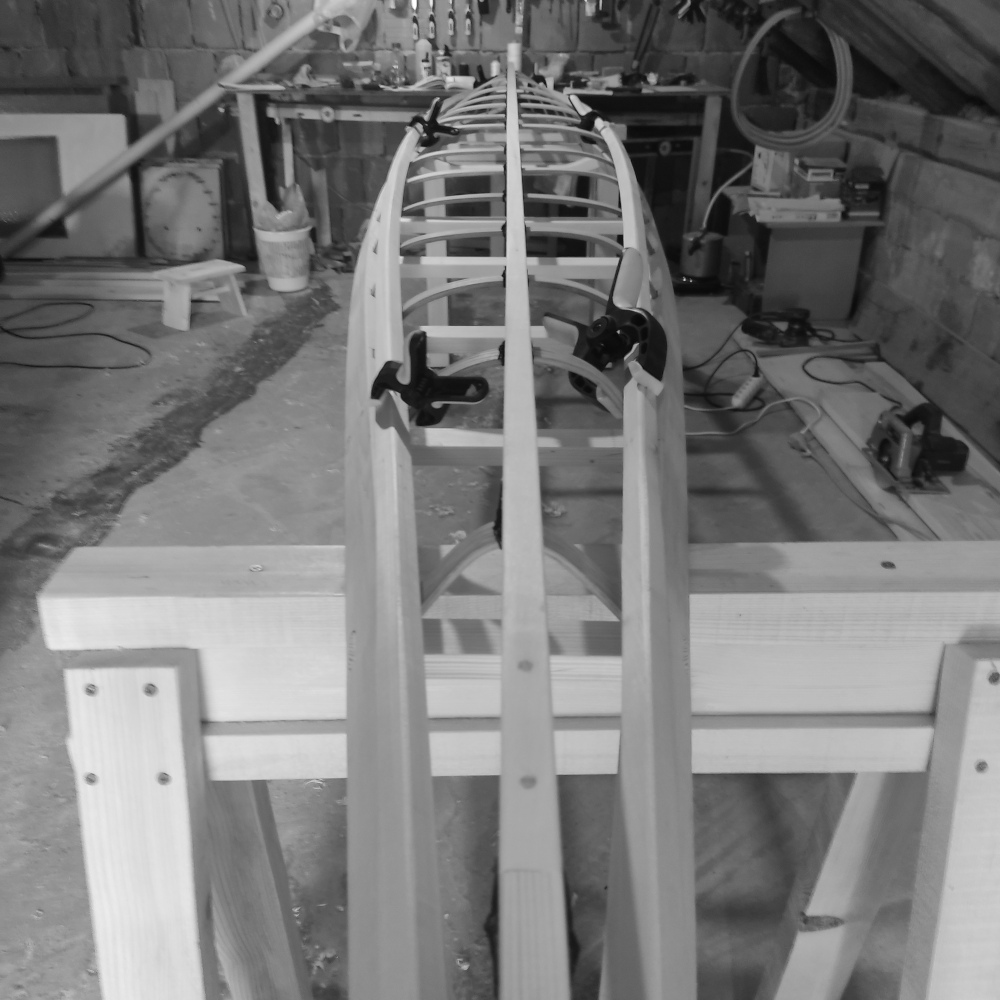
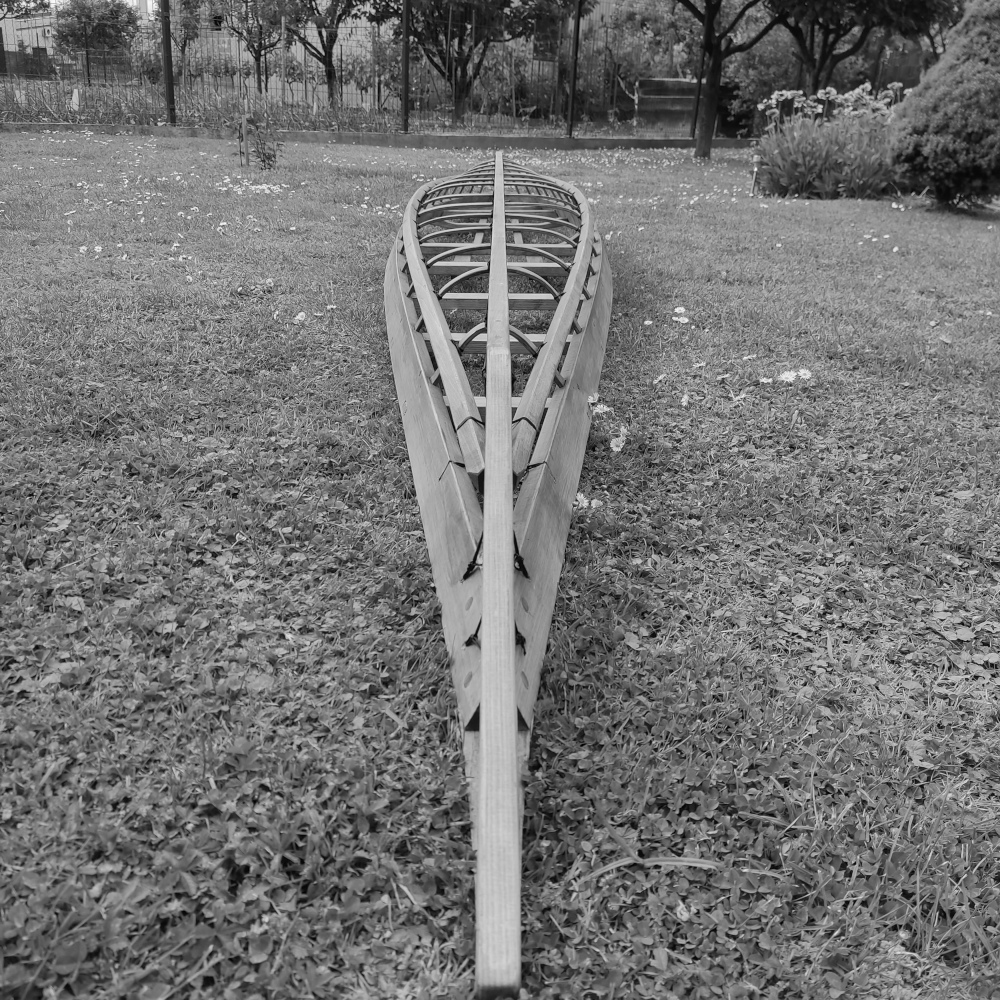
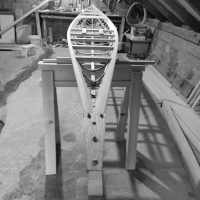
The hull is nearly finished. I go further with lashing the chines, checking if the keelson is straight, measuring the correct position for the chines, and doing some small adjustments if required.</p>

<p class="post-gallery three"><a href="/assets/images/posts/greenland-kayak/hull/08_keelson.jpg" data-fslightbox="gallery9"><img src="/assets/images/posts/greenland-kayak/hull/08_keelson_s.jpg" alt="keelson" /></a><a href="/assets/images/posts/greenland-kayak/hull/09_chines.jpg" data-fslightbox="gallery9"><img src="/assets/images/posts/greenland-kayak/hull/09_chines_s.jpg" alt="chines" /></a><a href="/assets/images/posts/greenland-kayak/hull/10_lashing_chines.jpg" data-fslightbox="gallery9"><img src="/assets/images/posts/greenland-kayak/hull/10_lashing_chines_s.jpg" alt="lashing_chines" /></a></p>

<p class="post-gallery two"><a href="/assets/images/posts/greenland-kayak/hull/11_lashed_hull.jpg" data-fslightbox="gallery10"><img src="/assets/images/posts/greenland-kayak/hull/11_lashed_hull_s.jpg" alt="lashed_hull" /></a><a href="/assets/images/posts/greenland-kayak/hull/12_interior.jpg" data-fslightbox="gallery10"><img src="/assets/images/posts/greenland-kayak/hull/12_interior_s.jpg" alt="interior" /></a></p>

<h3 id="deck-finishing">Deck finishing</h3>

<p><strong>Stem plates.</strong> Where the gunwales meet the stems. Grooves are made (at correct depth) with the saw, and wood is removed with the chisel later. This top part is more in contact with the skin, so I like to make it from somewhat more rot-resistant wood in every case. I usually use oak or European larch for stem plates. The stem plate is pegged to gunwales/stem and shaped with a spokeshave.
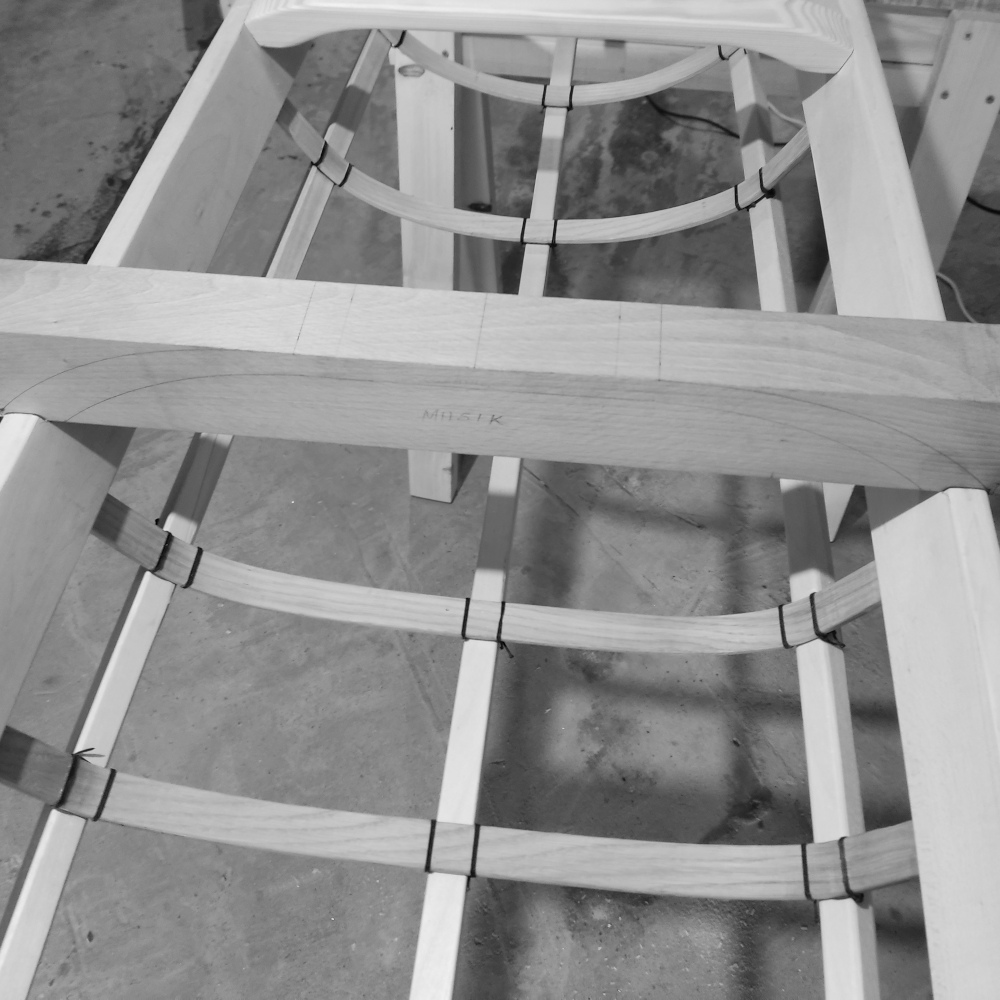
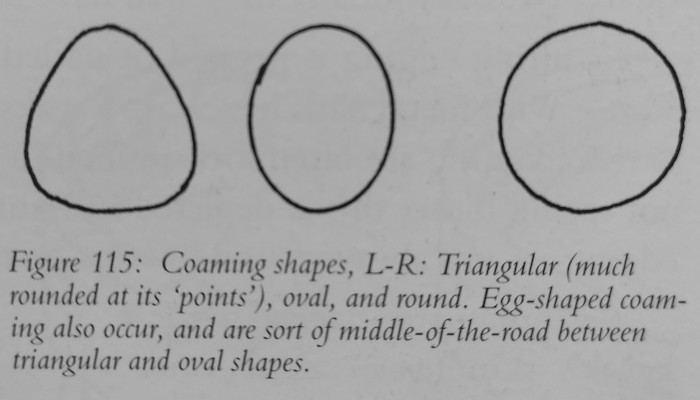
</p>

<p class="post-gallery three"><a href="/assets/images/posts/greenland-kayak/finishing/01_stem_plates.jpg" data-fslightbox="gallery11"><img src="/assets/images/posts/greenland-kayak/finishing/01_stem_plates_s.jpg" alt="stem_plates" /></a><a href="/assets/images/posts/greenland-kayak/finishing/02_stem_plates.jpg" data-fslightbox="gallery11"><img src="/assets/images/posts/greenland-kayak/finishing/02_stem_plates_s.jpg" alt="stem_plates" /></a><a href="/assets/images/posts/greenland-kayak/finishing/03_stem_plates.jpg" data-fslightbox="gallery11"><img src="/assets/images/posts/greenland-kayak/finishing/03_stem_plates_s.jpg" alt="stem_plates" /></a></p>

<p><strong>Masik</strong>. Curved deck beam which serves as thigh bracing. The front of the coaming comes in contact with it too. Flat-grained wood, especially soft wood, would be prone to splitting. I use ash for it, and I try to avoid flat grain, so I usually use vertical grain or slightly off vertical.<br />
Masik <strong>height</strong> needs to be made for the paddler so there is good thigh bracing and also a wet exit can be made safely. There is an interesting part looking at the kayak that was my main influence. It had a little bit lower masik height actually, but it was <strong>canted forward</strong> for a roomier cockpit so the entrance was easier. This can be found in “Kayaks of Greenland” by Harvey Golden in the “Repairs and Modifications on Greenland Kayaks” chapter. I guess this is a modification added later. I did not use this modification but slightly increased masik height.</p>

<p class="post-gallery three"><a href="/assets/images/posts/greenland-kayak/finishing/04_masik.jpg" data-fslightbox="gallery12"><img src="/assets/images/posts/greenland-kayak/finishing/04_masik_s.jpg" alt="masik" /></a><a href="/assets/images/posts/greenland-kayak/finishing/05_masik.jpg" data-fslightbox="gallery12"><img src="/assets/images/posts/greenland-kayak/finishing/05_masik_s.jpg" alt="masik" /></a><a href="/assets/images/posts/greenland-kayak/finishing/06_masik.jpg" data-fslightbox="gallery12"><img src="/assets/images/posts/greenland-kayak/finishing/06_masik_s.jpg" alt="masik" /></a></p>

<p>
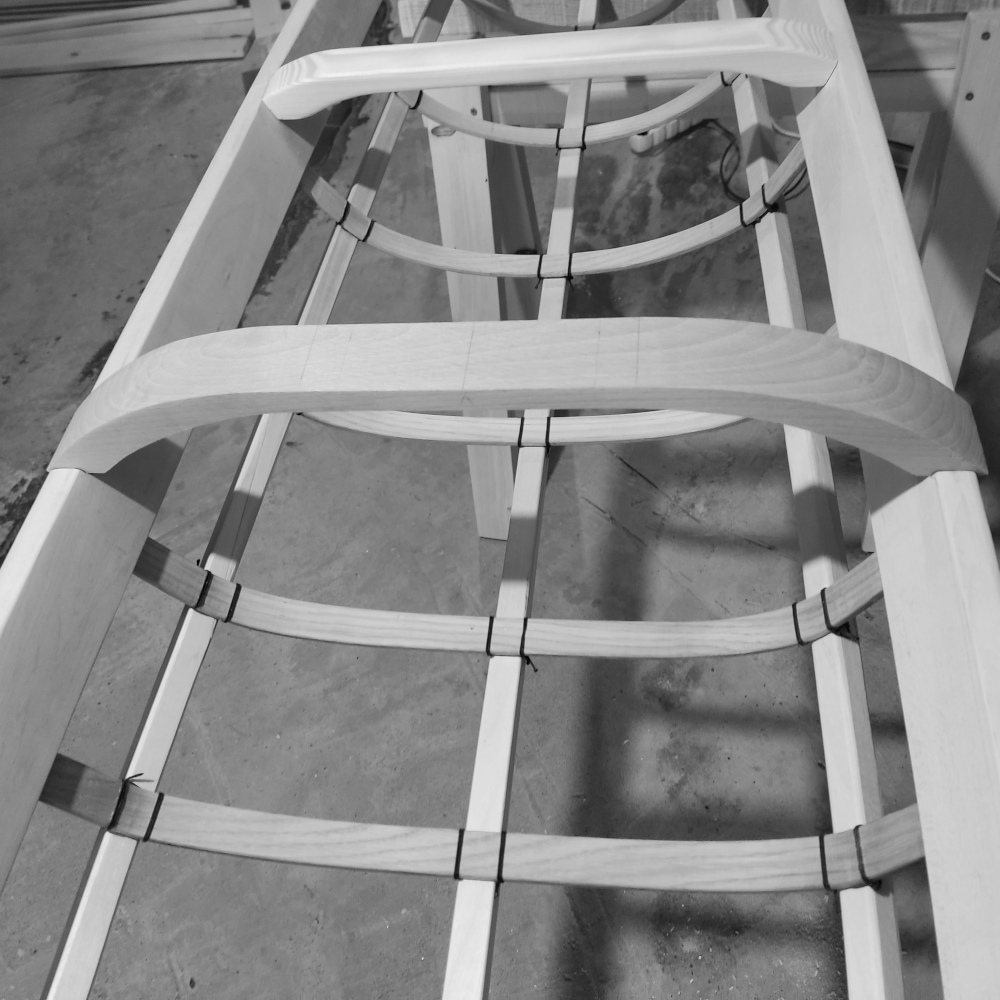
Setting up fore and aft deck ridges. This straight deck beam where fore stringers start is also the footrest, as I placed it in position for me. An additional straight deck beam is usually added for custom fit.</p>

<p class="post-gallery three"><a href="/assets/images/posts/greenland-kayak/finishing/07_forward_deck_ridges.jpg" data-fslightbox="gallery13"><img src="/assets/images/posts/greenland-kayak/finishing/07_forward_deck_ridges_s.jpg" alt="forward_deck_ridges" /></a><a href="/assets/images/posts/greenland-kayak/finishing/08_forward_deck_ridges.jpg" data-fslightbox="gallery13"><img src="/assets/images/posts/greenland-kayak/finishing/08_forward_deck_ridges_s.jpg" alt="forward_deck_ridges" /></a><a href="/assets/images/posts/greenland-kayak/finishing/09_forward_deck_ridges.jpg" data-fslightbox="gallery13"><img src="/assets/images/posts/greenland-kayak/finishing/09_forward_deck_ridges_s.jpg" alt="forward_deck_ridges" /></a></p>

<p>
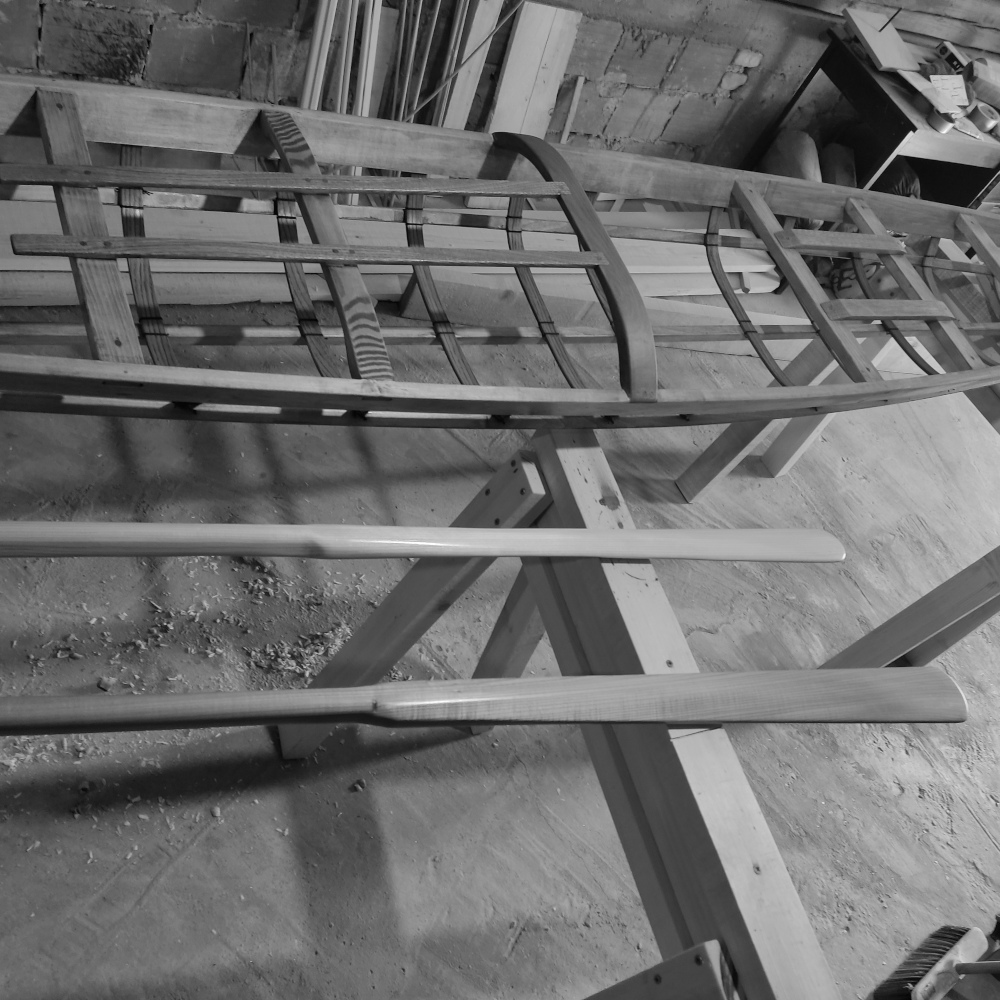
Some decking oil protection for the frame and tung oil for my paddles.
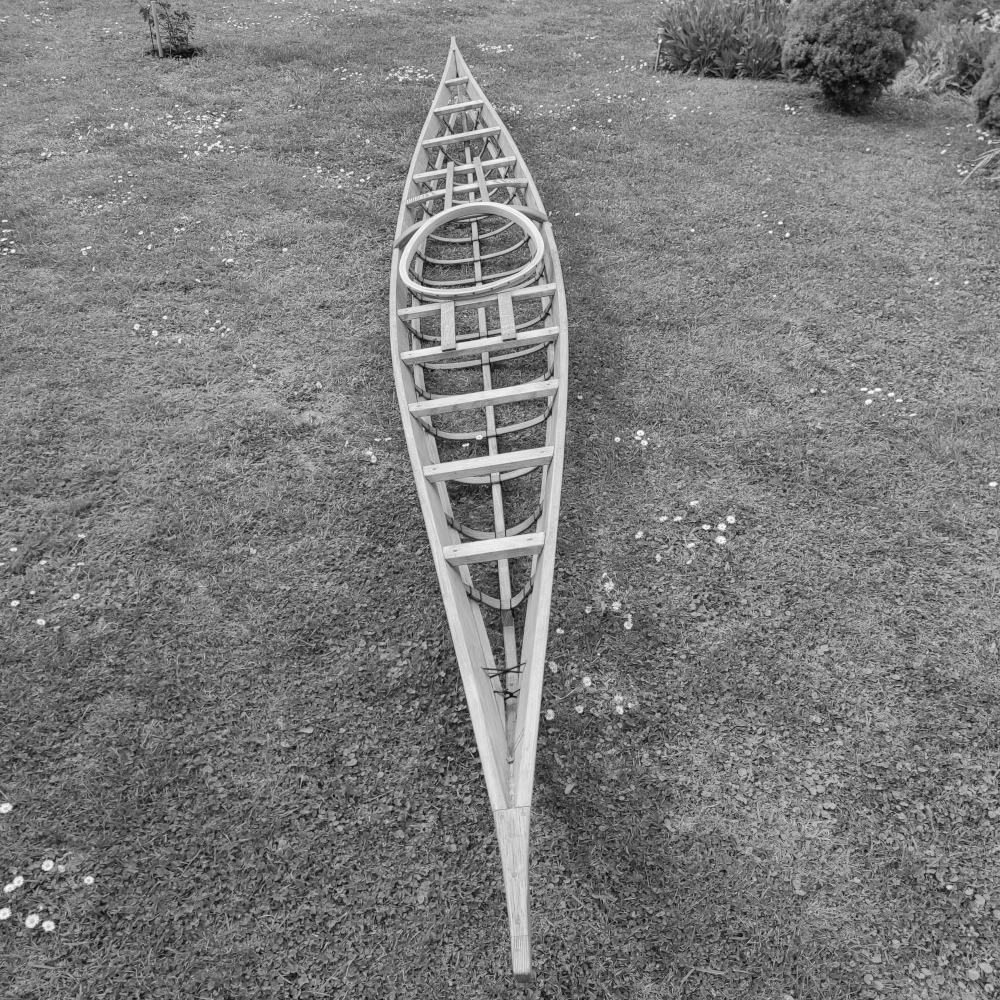
</p>

<p class="post-gallery two"><a href="/assets/images/posts/greenland-kayak/finishing/10_forward_deck_ridges.jpg" data-fslightbox="gallery14"><img src="/assets/images/posts/greenland-kayak/finishing/10_forward_deck_ridges_s.jpg" alt="forward_deck_ridges" /></a><a href="/assets/images/posts/greenland-kayak/finishing/11_finished_frame.jpg" data-fslightbox="gallery14"><img src="/assets/images/posts/greenland-kayak/finishing/11_finished_frame_s.jpg" alt="finished_frame" /></a></p>

<h3 id="finished-frame">Finished frame</h3>

<p>As I paddle mostly on the river Drava and lakes, I decided to go with a bit less bow rocker on this build. After my on-the-water tests, I realized it is more than enough tracking for me, so I increased it more on my later builds, as in the original drawings actually. I got a little <strong>more responsive</strong> kayak which will <strong>handle waves</strong> better in sea conditions. After all, it’s a <strong>sea kayak</strong>.<br />
This kayak ended up being 15kg after skinning and coating. <strong>Weight</strong> is something I didn’t pay attention to on this build, as I was more focused on kayak shape. Later, I started to use European silver fir/Norway spruce for longitudinals, and with correct sizing I managed to get a kayak (LOA 520cm and 53cm beam) of 12kg. You could say I’m satisfied now. :)<br />
I will probably cover the skinning and coating part in my next blogs.</p>

<p>West Greenland kayak <strong>details</strong> can be found in <a href="/creations/west-greenland-kayak">creations</a> part.</p>

<p class="post-gallery three"><a href="/assets/images/posts/greenland-kayak/finished/01_frame.jpg" data-fslightbox="gallery15"><img src="/assets/images/posts/greenland-kayak/finished/01_frame_s.jpg" alt="frame" /></a><a href="/assets/images/posts/greenland-kayak/finished/02_frame.jpg" data-fslightbox="gallery15"><img src="/assets/images/posts/greenland-kayak/finished/02_frame_s.jpg" alt="frame" /></a><a href="/assets/images/posts/greenland-kayak/finished/03_frame.jpg" data-fslightbox="gallery15"><img src="/assets/images/posts/greenland-kayak/finished/03_frame_s.jpg" alt="frame" /></a></p>

<p class="post-gallery three"><a href="/assets/images/posts/greenland-kayak/finished/04_frame.jpg" data-fslightbox="gallery16"><img src="/assets/images/posts/greenland-kayak/finished/04_frame_s.jpg" alt="frame" /></a><a href="/assets/images/posts/greenland-kayak/finished/05_frame.jpg" data-fslightbox="gallery16"><img src="/assets/images/posts/greenland-kayak/finished/05_frame_s.jpg" alt="frame" /></a><a href="/assets/images/posts/greenland-kayak/finished/06_frame.jpg" data-fslightbox="gallery16"><img src="/assets/images/posts/greenland-kayak/finished/06_frame_s.jpg" alt="frame" /></a></p>]]></content><author><name></name></author><category term="workshop" /><summary type="html"><![CDATA[Building a West Greenland kayak by studying historical Greenlandic hunting kayak examples and exploring traditional Inuit craftsmanship and construction techniques.]]></summary><media:thumbnail xmlns:media="http://search.yahoo.com/mrss/" url="https://noreaq.eu/assets/images/posts_list/west_greenland_kayak.webp" /><media:content medium="image" url="https://noreaq.eu/assets/images/posts_list/west_greenland_kayak.webp" xmlns:media="http://search.yahoo.com/mrss/" /></entry><entry><title type="html">Making a Greenland Cockpit Coaming</title><link href="https://noreaq.eu/workshop/2024/04/27/making-a-greenland-cockpit-coaming.html" rel="alternate" type="text/html" title="Making a Greenland Cockpit Coaming" /><published>2024-04-27T20:48:43+00:00</published><updated>2024-04-27T20:48:43+00:00</updated><id>https://noreaq.eu/workshop/2024/04/27/making-a-greenland-cockpit-coaming</id><content type="html" xml:base="https://noreaq.eu/workshop/2024/04/27/making-a-greenland-cockpit-coaming.html"><![CDATA[<p>A strong wooden hoop that forms the kayak cockpit. The Greenland coaming is not fastened to the kayak frame but laced with the amiq (skin) through coaming lacing holes.</p>

<h2 id="cockpit-coaming-shape-and-build">Cockpit coaming shape and build</h2>

<p>The coaming is created with <strong>steam-bent Slavonian oak</strong>. Although it’s possible to bend it freehand, a bending form is used to achieve a nicer shape.</p>

<p>The shapes of these forms are similar to an egg. It’s actually made through experimentation, so having something flexible in your workshop can really help here. A bandsaw blade turned out to be excellent for the job. Once you get the desired shape on one side, the rest is easy. A few spots are translated from one side to another and connected with the bandsaw blade.</p>

<p class="post-gallery two"><a href="/assets/images/posts/greenland-coaming/greenland_coaming_bending_form.jpg" data-fslightbox="gallery1"><img src="/assets/images/posts/greenland-coaming/greenland_coaming_bending_form_s.jpg" alt="greenland_coaming_bending_form" /></a><a href="/assets/images/posts/greenland-coaming/coaming_types.jpg" data-fslightbox="gallery1"><img src="/assets/images/posts/greenland-coaming/coaming_types_s.jpg" alt="greenland_coaming_bending_form" /></a></p>

<p>At right, figure 115 (from ‘Kayaks of Greenland’ by Harvey Golden) shows the more common coaming shapes among Greenland kayaks. The selected shape was something between triangular and oval, which should give a little more room for the back and hips than oval or round shapes.</p>

<p>Most traditional Greenland kayaks <strong>did not have a coaming edge</strong> to hold the spray deck. “Some had a short stick bent along the back of the coaming or short cleats to form a lip that held the back of a spray skirt or tuilik, but a tightly tied drawcord usually held them on the coaming” (Christopher Cunningham, ‘Building the Greenland Kayak’). For modern spray decks with elastic bungees, an edge around the entire coaming became necessary.</p>

<p><strong>Slavonia</strong> (a region of Croatia) has always had great oak. The best traditional fishing boats, which can be seen on the Drava and Danube rivers, were actually built from it as it was extremely rot-resistant.<br />
With a compression strap and soaking in water for a few days (if it’s kiln-dried), it’s possible to achieve nice curves without cracking.<br />
Magic usually starts to happen when the steam box reaches a temperature of 80°C and the wood is steamed for an hour per 2.5cm of thickness.</p>

<p>When the coaming is bent over the form and scarf joints are fastened with PU glue, the coaming edge is bent around the coaming and secured with bronze screws. Bronze has resistance to corrosion, and its darker color blends nicely with the oak.</p>

<p class="post-gallery three"><a href="/assets/images/posts/greenland-coaming/greenland_coaming.jpg" data-fslightbox="gallery2"><img src="/assets/images/posts/greenland-coaming/greenland_coaming_s.jpg" alt="greenland_coaming_bending_form" /></a><a href="/assets/images/posts/greenland-coaming/greenland_coaming_edge.jpg" data-fslightbox="gallery2"><img src="/assets/images/posts/greenland-coaming/greenland_coaming_edge_s.jpg" alt="greenland_coaming_bending_form" /></a><a href="/assets/images/posts/greenland-coaming/greenland_coaming_edge_02.jpg" data-fslightbox="gallery2"><img src="/assets/images/posts/greenland-coaming/greenland_coaming_edge_02_s.jpg" alt="greenland_coaming_bending_form" /></a></p>

<p>Once the coaming is correctly positioned over the Masik (Greenlandic word for the main curved deck beam and cockpit forward end) and Isserfik (cockpit aft-end deck beam), it’s ready for lacing with the skin.</p>

<h3 id="cockpit-coaming-size">Cockpit coaming size</h3>

<p>It should be noted that these Greenland coamings were <strong>small</strong>. Regarding the width of the coaming, H.C. Petersen writes in his ‘Instruction in Kayak Building’ book: “The external diameter of the hoop is determined by the width of the kayak. It must be 10cm less than the width of the kayak.” Looking at historical Greenlandic kayak drawings by Harvey Golden from his ‘Kayaks of Greenland’, it can be seen that H.C. Petersen’s statement is actually very accurate, as most coamings were in this range.<br />
The inner coaming length is usually slightly bigger than the width. Compared to historical examples, I’ve increased it slightly (around 3cm), but you can’t actually increase it too much because of the correct Masik position needed to have a nice tight fit and contact of the Masik with your upper knee.</p>

<p><strong>Interestingly</strong>, Greenland hunting kayaks often had coamings <strong>slightly offset</strong> to the right or left depending on whether the hunter was right-handed or left-handed, as a centered coaming was a poor working position for the hunter (H. C. Petersen, 1986).</p>

<p>More coaming details can be found in <a href="/creations/greenland-cockpit-coaming">creations</a> part.</p>]]></content><author><name></name></author><category term="workshop" /><summary type="html"><![CDATA[Making a Greenland cockpit coaming from steam-bent Slavonian oak]]></summary><media:thumbnail xmlns:media="http://search.yahoo.com/mrss/" url="https://noreaq.eu/assets/images/posts_list/greenland_coaming.webp" /><media:content medium="image" url="https://noreaq.eu/assets/images/posts_list/greenland_coaming.webp" xmlns:media="http://search.yahoo.com/mrss/" /></entry></feed>